|
|
This tutorial takes you through the process of building several simple projects using Spin. Before you try this tutorial, you should have downloaded and installed Spin (See also the Spin Installation Guide). You should also refer to the Spin User's Guide.
Spin can be used to build many different kinds of applications. In this tutorial, you will build both stand-alone applications and server-side applications (including servlets). A server-side application is an application that runs on a server (typically a web server) and communicates remotely with the user through a client (typically a web browser). The Spin User's Guide has more information on server-side applications. You will also use Spin to build applications that access remote information and services, using both databases and Enterprise JavaBeans.
One of the most powerful features of Spin is that it allows you to edit a project while it is running, so you can immediately see how it behaves while you are making changes to it. There is no need to switch between edit mode and run mode, to compile and run your application separately, or even to restart it from the beginning each time you make a change.
Spin is a tool for assembling applications out of components. We encourage you to actually build the tutorial projects, and play around with other components. After you finish building the projects in this tutorial, a good next step is to examine and play with the example programs.
beans
subdirectory of the Spin installation directory.
You can add new components to the beans subdirectory
if you want to use them in Spin.
When Spin finishes loading components, you will see a project
window for a new (empty) project.
If Spin encounters any errors, they will be shown in a separate window, called the Console window. The console might also contain informational messages from the PointBase database, if you have it enabled. If the console window is not visible, you can make it visible from the View menu.
In the File menu of the project window, select "New Capsule". An outline view appears containing a single empty capsule.
Summary of Steps: Creating a new capsule
|

No matter what kind of application you are building, you will typically use a project to hold all the different files that make up the application. These files can include images, HTML files, and (most importantly to Spin) capsules.
A capsule is where you assemble your components into an application. A project
contains one or more capsules. A capsule itself can be used as a component in
other capsules, or a (top-level) capsule can be a servlet, an applet, or a stand-alone
application.
Building Stand-Alone Applications
A stand-alone application includes its user interface (unlike a server-side
application, which uses a web browser for its user interface).
The outline view shows a capsule in outline form, as a hierarchy. To interact with the user interface of a stand-alone application (so you can run the application while you are editing it), you use the toybox view. The toybox view only shows visible user-interface components (like buttons and images). You can edit your project from either the outline view or the toybox view.
In the outline window, go to the View menu and choose "Open Toybox". Another window appears with the toybox view of the (still empty) capsule.
When you use a component in Spin, the instance of that component is called an actor.
From the toybox window, open the Insert menu, and move your mouse down to com.webgain.spin.demo, then move your mouse to the right and select Juggler. The juggler appears in the toybox view and an icon for the juggler appears in the outline view.
In the outline view, the juggler appears as a child of the capsule, and is automatically given the name "Juggler" by Spin. Spin ensures that the name of each item in a capsule is unique; if you insert another juggler, it will be given a unique name by appending a number (for example, Juggler3). You can change the name to whatever you want by clicking on the item and typing a new name.
In the toybox view the actors (components) are always active, so you can see the juggler juggling. Below the juggler is an editing handle containing the name of the juggler. The editing handle is normally white, but when you click on it it changes to blue, indicating that the actor it is attached to has been selected. You can change the name of the actor in the toybox view by double-clicking on the name (changing the name in either view changes it in both views, of course). You can move the juggler around by dragging its editing handle, and you can resize the juggler using the triangular resize widget in the lower right corner.
When you select the juggler by clicking on its editing handle, the editing handle turns blue and a menu called "Actor" appears in the menu bar. The "Actor" menu is specific to the selected actor. A shortcut to get the "Actor" menu is to press the right mouse button (command-click on the Mac) while over the editing handle for a component.
Summary of Steps: Adding a Juggler bean
|
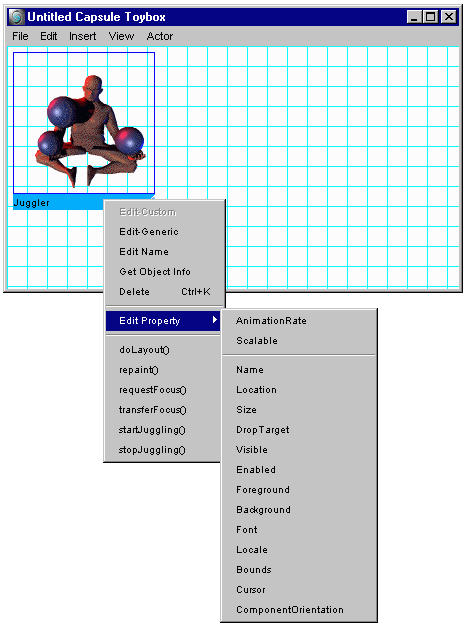
The menu for the juggler contains three sections. The first section contains five choices:
Edit-Custom — a JavaBean can have a custom editor associated with it. In the case of the juggler there is no custom editor, so this selection is grayed out.
Edit Generic — brings up a generic dialog that lets you view and edit all properties of this actor.
Edit Name — edits the name of the actor.
Get Object Info — shows the public variables, properties, methods, and events for this actor. If this actor has any JavaDoc documentation in the docs subdirectory of the Spin installation directory, that information is also displayed.
Delete — deletes this actor.
The second section contains the command "Edit Property". If you put your mouse cursor over this command, a sub-menu appears with all the properties of this bean, which you can edit.
The final section contains methods that you can execute on this bean. These are the methods on the bean that take no arguments.
The "Actor" menu also appears in the outline view, except that it does not contain the last section containing the methods you can execute (methods can only be executed in the toybox view). As in the toybox view, you can also bring up this menu by right-clicking on the icon of the juggler (command-clicking on the Mac).
First, let us execute a couple of methods on the juggler. In the toybox view "Actor" menu, select the method "stopJuggling()" — The juggler stops juggling. Repeat this, and select the method "startJuggling()" — the juggler starts juggling again.
Most of the other methods in this section of the menu are internal methods that relate to how Java draws objects on the screen, and are not of particular interest.
Summary of Steps: Playing with the Juggler
|
There are several ways to edit the properties of the Juggler. These work in both the toybox view and the outline view.
The first way is with a generic editor. From the Actor menu, choose the "Edit-Generic" command. For the juggler the generic property editor has two tabs. The first tab is for the Juggler itself and contains two properties: "AnimationRate" and "Scalable". Change the AnimationRate to 50, and press the "OK" button — the juggler runs faster. You can also click the "Apply" button rather than the "OK" button to leave the dialog open so you can try various values. The "Scalable" property controls whether or not the juggler changes in size when you resize it.
Summary of Steps: Editing properties of the Juggler
|
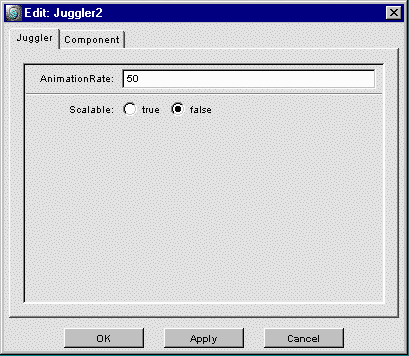
Note that the meaning of the AnimationRate property was determined by the JavaBean author. In this case, the rate is actually a delay (in milliseconds) between frames of the animation.
The second tab of the property editor is for the properties of the Juggler's superclass, which in this case is Component (most visual JavaBeans are derived from class Component). A superclass is used to collect similar properties and functions together. In Java, visual JavaBeans are derived from Component so that the author of the JavaBean does not need to rewrite similar functionality for every visible bean.
Choose the tab for Component, and change both the x and y value for Location from 0 to 20. When you press the "Apply" button, the juggler moves to the specified position. You can also make the juggler invisible with the "Visible" property, and change its size.
Some of the properties of Component do not apply to the juggler. For example, the juggler does not contain any text, so changing the Font property has no effect, nor does changing the foreground or background color.
The second way to change properties of an actor is with a custom editor. A custom editor is an editor that is supplied with a JavaBean. The juggler does not have a custom editor, so the "Edit-Custom" command is grayed out.
You can also select the juggler (in either view) and choose the "Edit Selected Object" command from the "View" menu. This brings up an edit dialog for the actor. This is a custom editor if the actor has one; otherwise it is a generic editor.
Finally, you can edit a single property of an actor using the "Edit Property" sub-menu of the "Actor" menu. This is mainly useful for changing a single property quickly. Bring up the "Edit Property" sub-menu of the "Actor" menu and select "Cursor" (near the bottom of the list). Change the cursor from "Default" to something else (for example, to "Hand"), and then click the "OK" button. Now notice that when the cursor is over the juggler, it changes to whatever cursor you selected.
In the toybox view, grab the juggler by its editing handle and move it to the center of the toybox view. Now, click anywhere inside the toybox view except on the juggler to deselect it. The editing handle for the juggler should change to white (from highlighted blue).
Now, from the Insert menu, go to "AWT Component" and select "Button". A button should appear in the toybox view. Look in the outline view -- there should be two objects as children of the capsule, the juggler and the button. Initially the button is rather small.
A common mistake is to leave some actor selected and insert a new actor as a child of another actor, rather than as a child of the capsule. There is nothing wrong with doing this, it is just not what we want in this example. If you make this mistake, you can simply drag and drop the component in the outline view to put it where you want it. For example, if you ended up with the button as a child of the juggler, you could drag the button and drop it onto the capsule, to make it become a child of the capsule.
Summary of Steps: Adding a button
|
Remember that there are several different ways to do this. First, let's resize the button to make it larger, using the resize widget on the edit handle. Notice that Spin displays the size of the object as you resize it. You could also resize the button by editing its Size or Bounds property. You can also move the button around using the edit handle, or by editing the Location or Bounds property.
Second, let's give the button a label. Change the "Label" property so that the button says "stop". You can also change the background color, font size, or other properties (note that due to a bug, on the Macintosh editing the background color of a heavyweight component does not do anything).
Summary of Steps: Editing properties of the button
|
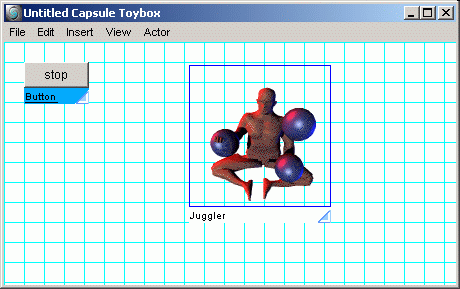
Now we want to actually make the button do something. In Spin, you cause components to do things by giving them behaviors.
In the toybox view, select the button by clicking on its editing handle (the editing handle turns blue to indicate it is selected).
We could add a behavior using the Insert menu, but we are going to use a palette instead. In the View menu, go to the Palettes command, pull right and select "Behaviors". A small window should pop up containing 6 icons, one for each of our built-in behaviors. When you move your mouse cursor over a behavior, the name of the behavior appears in the status line of the palette.
Summary of Steps: Displaying a palette of behaviors
|

Click on the first icon in the palette, which is the "Action" behavior. An action behavior appears as a child of the button in the outline view. In the toybox view, the action behavior appears as an icon in the edit handle for the button.
Summary of Steps: Inserting a behavior
|
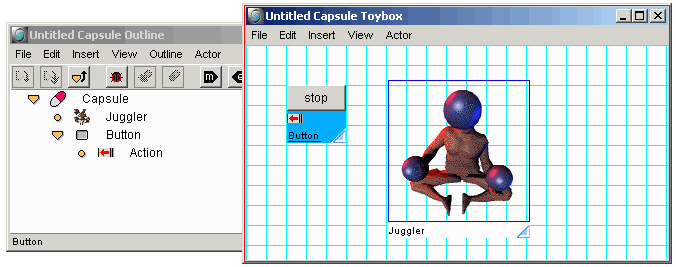
In either the outline or the toybox view, double-click on the icon for the action behavior. This brings up the editor for the action behavior. This editor has several fields. To the right of each field in the action behavior is a right-pointing triangular arrow. When you click on this arrow, a menu appears giving possible values for the field.
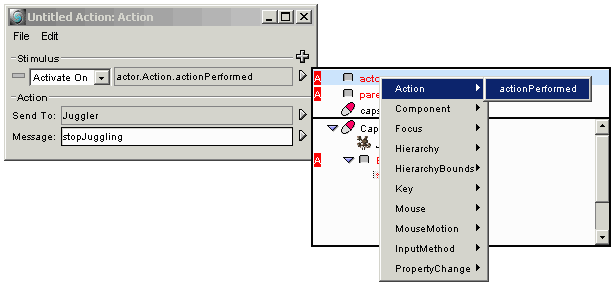
The "Activate On" field sets the stimulus for this behavior, which is an event. Click on the triangular arrow to the right of this field, and a window pops up. The top part of this window contains the aliases "actor", "parent", and "capsule". The bottom part of this window looks like the outline view. Select the alias "actor", and another menu pops up. Select "Action" and "actionPerformed" (as shown in the figure).
Specifying "actor" means whatever actor this behavior is a descendent of, which in this case is the button. We want this behavior to activate when the button is pressed, so we choose the "Action.actionPerformed" event, which is the Java user interface way to say "whenever this UI widget has some action performed on it." In the case of the button, the expected action is a mouse click.
In response to the stimulus, we want the juggler to stop juggling. Set the "Send To" field to "Juggler" (using the triangular arrow). Finally, set the message to "stopJuggling". The "stopJuggling" method takes no arguments, so we are finished specifying this action.
Now, in the toybox view, click on the stop button, and the juggler stops juggling. That's all there is to it. There is no need for a separate compile step or anything else; it just works immediately. You don't even have to close the window for the action behavior.
Summary of Steps: Specifying an Action Behavior
|
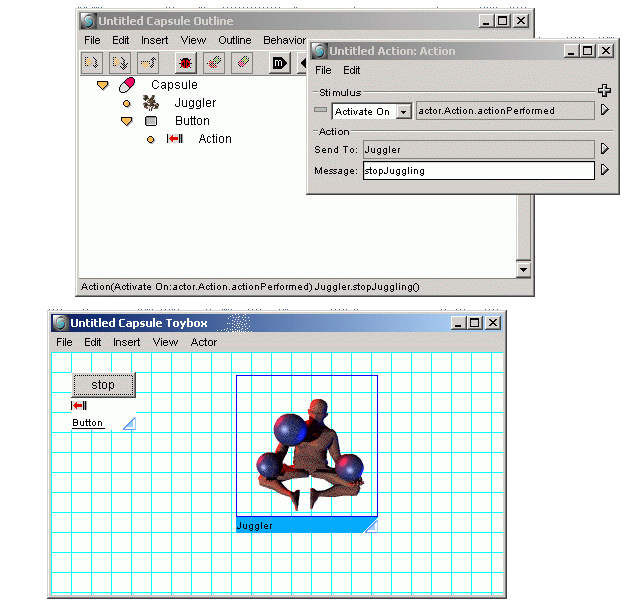
In our project so far we have two actors (the juggler and a button) and a single behavior. Note that the behavior's parent does not actually have to be the button. The behavior's parent could be the juggler, or even the capsule. The main thing that is affected by a behavior's parentage is what the aliases "actor" and "parent" refer to.
When the behavior is a child of the button, we can refer to
the button using the alias "actor" — this is what we did when
we had the behavior activate on actor.Action.actionPerformed.
If the action behavior were a child of the juggler, then
the actor alias would refer to the juggler.
In this case, the stimulus would have to name the button explicitly
(rather than using the alias "actor", since "actor" would now refer
to the juggler). However, the action could send the message "stopJuggling"
to the "actor" alias.
If the action behavior were a
child of the capsule, then "actor" would refer to the capsule. In
this case, we would have to name both the button and the juggler
explicitly.
The advantage of making the action behavior be a child of the button is that it makes it easy to reuse behaviors. We will demonstrate this by creating a second button, a start button.
Dragging a copy of an object's icon to a new position while holding down the control key is a shortcut for inserting another copy of an object. You could also have inserted another button using the menus.
In the outline view, both of our buttons have a yellow right pointing arrow to the left of their icons, indicating that they have children. Click on both of these arrows to see the children (the arrow changes to a down pointing arrow).
Summary of Steps: Making a copy of the button
|
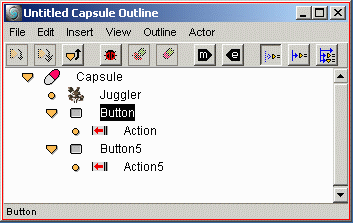
Now change the second button to be a start button. This can be done in either the outline or the toybox view, but we will do it in the outline view. Double click on the icon for "Button5", which brings up the object editor dialog. Change the label from "stop" to "start" and click the "OK" button. Now, double click on the icon for the "Action5" behavior, which brings up the editor for the action behavior. Change the Message field from "stopJuggling" to "startJuggling" and close the dialog.
We now have a start and a stop button, but they have the same position in the toybox view. Go to the toybox view, and drag the top button to a new position (by dragging on its edit handle). Arrange the two buttons as you wish.
Finally, click on the start and stop buttons to verify that the juggler starts and stops juggling.
Summary of Steps: Changing one button to be a start button
|
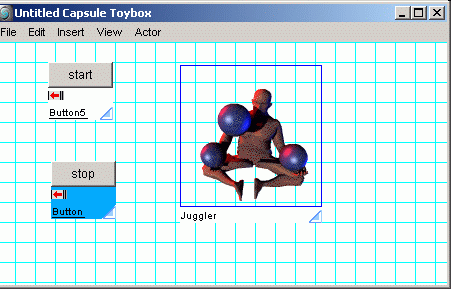
Note that both behaviors activate on actor.Action.actionPerformed,
but since they have different parents, the alias "actor" refers to
the proper object.
You might want to see what your project looks like without the stuff that is not actually part of the project (such as the editing handles and the background grid). From the View menu in the toybox view, choose "Hide/Show Editor". You can still click on the start and stop buttons to make the juggler start and stop, but you cannot edit anything in the toybox view.
Alternatively, from either the toybox or outline view, choose "Run" from the File menu. A new window is created with your running project. There are a couple of differences between this window and the toybox. Most noticeably, the window is automatically sized to include just the objects in your project (and the origin). There are a few other differences, mainly having to do with compilation.
Summary of Steps: Viewing your project
|

We are now going to add a scrollbar to control the juggling speed. Go back to the toybox view, make sure editing is back on (by choosing "Hide/Show Editor" from the View menu), and click on the background to make sure that no actors are selected. From the Insert menu, go to "AWT Component" and select "Scrollbar". A new scrollbar is inserted into your project.
Using its editing handle, move the scrollbar, and using the resize widget at the right end of the editing handle, resize the scrollbar to make it about the same height as the two buttons.
Summary of Steps: Adding a scrollbar
|
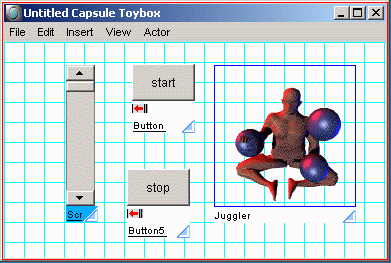
Now, make sure the scrollbar is selected (its editing handle is highlighted), and from the Insert menu (or from the palette containing the behaviors) insert a new action behavior. The action behavior appears in the editing handle for the scrollbar. Double click on the icon for the new action to bring up its edit dialog.
Set the "Activate On" field to
actor.Adjustment.adjustmentValueChanged so this behavior will
activate when the value of the scrollbar is changed. Set the "Send
To" field to "Juggler" and set the "Message" field to "setAnimationRate".
A data field appears to indicate that the setAnimationRate message requires
an int (integer number) argument.
The button to the left of the last field shows "Const:", which allows you to specify a constant value, but we want to pass the value from the scrollbar. Click on the "Const:" button and it changes to "Eval:" and a triangular arrow appears at the right end of the field. Click and hold the triangular arrow and select "event" (meaning the event that stimulated this behavior) and then "getValue()" (which gets the value of the scrollbar from the event).
Summary of Steps: Scripting in a behavior
|
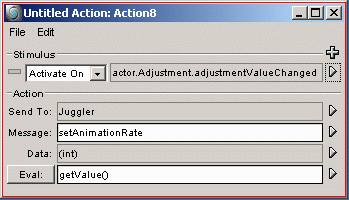
Close the edit dialog for the action behavior. Go back to the toybox view, make sure the juggler is juggling (by pushing on the start button if necessary) and change the value of the scrollbar. The juggling speed should change.
Notice that when you first changed the value of the scrollbar, a
window popped up and said "Grinding Beans". This shows that Spin is
compiling the expression you typed into the "Eval:" field. In this
case, this expression is very simple — just the value of the
scrollbar — but it could be an arbitrary Java expression.
For example, try changing the value to be "getValue() * 2"
so that the animationRate property of the juggler is set to twice
the value of the scrollbar. Or you can use "getValue() + 10"
or any desired expression.
There are several properties of the scrollbar that you can change. For example, you can change the minimum and maximum values of the scrollbar, or how much the value changes when you click in various parts of the scrollbar. Notice that while you are making these changes, the toybox view merrily continues to work, so you can immediately see the effects of your changes.
This is a good time to save your work. From the File menu of the Capsule view, choose "Save". A file dialog comes up. The "examples" subdirectory of the Spin installation directory is a good place to save your capsule file, but you can save it anywhere you want. By convention, capsules are saved with a ".zac" suffix. As in any tool, you should save your work often.
Because you can type an arbitrary expression into the "Eval:" field of a behavior, it is possible to type an incorrect expression and cause an error. Spin can help you find and correct errors like this.
Double click on the action behavior for the scrollbar to bring up its edit dialog. Go to the "Eval:" field, and change the first letter so that the expressions reads "petValue()" rather than "getValue()". Go to the toybox view and move the adjustment button of the scrollbar. The "Grinding Beans" message appears, indicating that Spin is recompiling an expression, but in this case an error occurs and the following window appears.
Summary of Steps: Finding an error
|

Double click on the first message in this window, and Spin pops up the behavior where the error occurred, in this case the action behavior for the scrollbar. Change the "Eval:" field from "petValue()" back to "getValue()". You can leave the edit dialog open. Drag the adjustment value of the scrollbar. Spin puts up the "Grinding Beans" message briefly to recompile the expression, and then everything runs properly.
A rollover is a visual object that changes appearance when the mouse cursor moves over it. You can create a rollover in Spin with two simple action behaviors. In the toybox view, select the start button (so that its editing handle is highlighted) and insert two action behaviors. This leaves the start button with three behaviors (the original behavior that starts the juggler juggling, and the two you just added). Change the name of one of these behaviors to "enter" and of the other to "exit".
Double click on the "enter" behavior to open its edit dialog. Set the "Activate On" field to "actor.Mouse.mouseEntered". Leave the "Send To" field as "actor". Change the "Message" field to "setLabel" and in the "Const:" field enter the string "push me" (without the double quotes). Now move the mouse over the start button in the toybox, and observe that the button label changes to "push me".
Now, double click on the "exit" behavior to open its edit dialog. Set the "Activate On" field to "actor.Mouse.mouseExited". Leave the "Send To" field as "actor". Change the "Message" field to "setLabel" and set its "Const:" field to "start". Close the behaviors.
In the toybox view, when the mouse moves over the start button the button label changes to "push me", and when it moves away from the start button the label changes back to "start". You've created a rollover!
You can make the stop button do the same thing by copying the two new behaviors to the actor for the start button. This can be done in either the outline or the toybox view. You can copy behaviors either using Copy and Paste from the Edit menu, or by "control-dragging" the icons (option-dragging on the Mac). Note that you must change the "exit" behavior on the stop button so that it sets the button label to "stop" instead of "start".
You can use a rollover to change any property of an actor, not just the label of a button. Note, however, that visual components (like an AWT button) may behave differently on different platforms. For example, on the Macintosh you cannot change the background color of an AWT component, due to a limitation of MRJ (Macintosh Runtime for Java).
In the outline view, select the "start" button, and insert an ActionGroup behavior. Change the name of the ActionGroup to "Rollover". Edit the ActionGroup behavior, and set its "Activate On" field to "actor.Mouse.mouseEntered".
As children of the Rollover ActionGroup, insert a regular action behavior and a string data item (from the "Data Item" submenu of the Insert menu). Change the name of the action behavior to "save" and the name of the string to "label".
Double click on the "save" behavior to edit it. Set the "Activate On" field to "parent.Behavior.activated" (this activates the "save" behavior when the "Rollover" group behavior is activated). Set the "Send To" field to "label", and the "Message" field to "set". Click on the "Const:" button to change it to "Eval:" and set the field to "actor.getLabel()". This saves the label of the actor in the string variable.
Drag the "enter" and "exit" behaviors from the start button to make them children of the "Rollover" group behavior. Change the "enter" behavior so that it is activated on "parent.Behavior.activated". (Astute readers will notice that this is not actually necessary, but it is good form). Finally, edit the "exit" behavior and click on the "Const:" button to change it to "Eval:", and set the field to "label". This will restore the saved label when the mouse exits the actor.
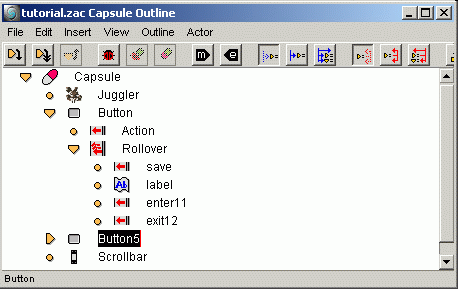
The Rollover behavior can be applied to any actor that has a "label" property, and it will set the label to "push me" whenever the mouse is over the button. For example, you can copy the "Rollover" behavior onto the stop button. But there is a better way to apply behaviors like rollovers to new actors.
Go to the outline view, and click on the rollover behavior to select it. Choose "Save Behavior" from the File menu. This saves the "Rollover" behavior so you can reuse it.
Now, go to the Insert menu and look in "User Behavior". You see a new user behavior called "Rollover."
This new user behavior can be used like any behavior, and will work for any component that has a label. You can also modify the behavior to change other properties.
Note that when you insert a User Behavior, a copy of the behavior is made. This allows you to edit one instance of the behavior without changing other instances of the behavior. For example, you can change one of the Rollover behaviors so that it says something other than "push me".
There are other User Behaviors already in the Insert menu, called Spiral, Drag, and Jump. Feel free to play with these and see what they do. The user behavior named "ServletGet" is for use with servlets; you will see an example of its use later.
You can save your capsule as a finished application by choosing "Save As Jar" from the File menu of the Capsule view. Name your application, for example, "myapp.jar" (you should always use the ".jar" extension so that this application can be correctly loaded by other Java tools). When you click OK, the file myapp.jar is generated. In it is the class "myapp", which can be executed. Check the console for any errors. If your capsule fails to compile it will not save as an application.
To run the generated application you need to start it from a Java interpreter. To do this you must gather together the .jar files needed by the beans used in the application, and also any media files that you have used. In this example, these are:
myapp.jar (your application)
juggler.jar (from the beans directory)
These must be in your java CLASSPATH in order to run the application. In addition any Spin project will need the class library file spinlib.jar. A typical command to run this application, on Windows, is:
java -classpath %classpath%;myapp.jar;juggler.jar myapp
This command assumes that the files myapp.jar and juggler.jar are in the current directory, and that your CLASSPATH contains the full pathnames to the file spinlib.jar. You can also specify these files in the command, for example:
java -classpath %classpath%;myapp.jar;juggler.jar;spinlib.jar;myapp
Remember to specify the full pathname for any file that is not in the current directory. If you are working in any directory other than the Spin install directory, you also need to specify the location of the license file. See the manual Deploying Spin Projects for full information about saving and deploying applications.
Instead of running the juggler as an application, you can save it so that it can be run as an applet in a browser. Saving an applet is similar to saving an application, except that you change the kind of capsule that you save.
In the outline view, select the capsule. A "Capsule" menu is added to the menu bar. From the Capsule menu, choose "Edit Properties". In the dialog that comes up, change the type of the capsule from "Application" to "Applet". Close the Capsule Properties dialog.
Now, choose "Save As Jar" from the File menu, as before. You can give your applet the same name, or a different name, but be sure to use the ".jar" suffix.
The files needed to view this applet are the same as for your application (myapp.jar, juggler.jar, and spinlib.jar), except that you will also need an HTML file in which to view the applet. It will look like the following (if you saved your applet in the file myapplet.jar):
<HTML>
<HEAD>
   <TITLE>Applet test</TITLE>
</HEAD>
<BODY>

<H1>My Applet</H1>

<P>
<HR>
<APPLET CODE="myapplet.class" WIDTH=200 HEIGHT=100 ALIGN=bottom
 archive="myapplet.jar,spinlib.jar,juggler.jar">
</APPLET>
<HR>

</BODY>
</HTML>
After installing the .jar and the .html files (don't forget the Spin class library spinlib.jar) on your web server you should be able to view the applet in a browser.
Because JavaBeans are relatively new, we have found that only newer
versions of the popular browsers can view applets containing JavaBeans
properly (and all Spin applets contain JavaBeans).
If your browser does not handle JavaBeans correctly,
refer to the manual "Deploying Spin Projects"
for information on things you can do to make your applet run on older browsers.
Building Servlets
Servlets are applications that run on a web server, and interact with
the user over the Internet.
Servlets are different from other projects you build in Spin,
because a servlet does not directly interact with the user.
Instead, a servlet runs on a web server,
and uses HTML and CGI to communicate with a web browser.
The user interacts with the browser, which interacts
with the server, which interacts with the servlet.
Not surprisingly, writing servlets is not like writing stand-alone applications or applets, but does have the advantage that anyone with a browser can interact remotely with a servlet. Even a browser that does not understand Java can interact with a Java servlet, because the servlet runs on the server (not on the browser). The browser only sees regular HTML, sent to it by the servlet.
Servlets are like CGI scripts, but with a number of significant advantages. Servlets are covered in Chapter 2 of the Spin User's Guide. This section walks you through the process of building and testing a servlet. This document assumes that you already understand HTML (including basic CGI).
Because servlets do not interact with the user, they have no visual interface and do not normally contain any visual actors, such as buttons or jugglers. Consequently, the toybox or layout views are not normally used when you are building a servlet. Instead, you use a regular web browser to interact with your servlet. You can use any browser to interact with your servlet, including Microsoft Internet Explorer or Netscape Navigator. Spin contains a built-in web application server (a web server that can execute servlets) that runs your web application and communicates with a browser.
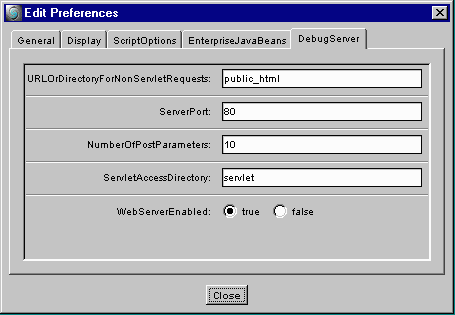
Notice that the ServerPort is set to 80. By convention, browsers communicate with Web servers over port 80. If you already have a Web server on your computer, you will have to use a different port for Spin's debug Web server. A typical alternate value is port 90 (except on UNIX, where low-numbered port numbers are restricted; use 8080 instead).
Close this window.
Summary of Steps: Enabling the Debug Server
|
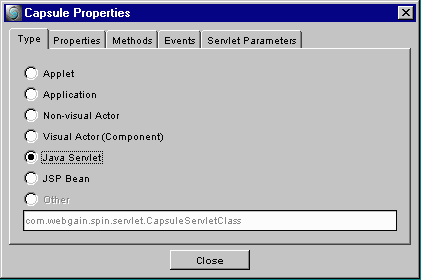
Open a new capsule (choose "New Capsule" from the File menu). In the outline view, the capsule should be selected. If not, click on it to select it. In the Capsule menu, select "Edit Properties" (you can also do this from the right mouse button menu). This brings up a dialog for the properties of the capsule. Change the capsule from an Application to a Java Servlet. Close this window.
Summary of Steps: Set Capsule type to Java Servlet
|
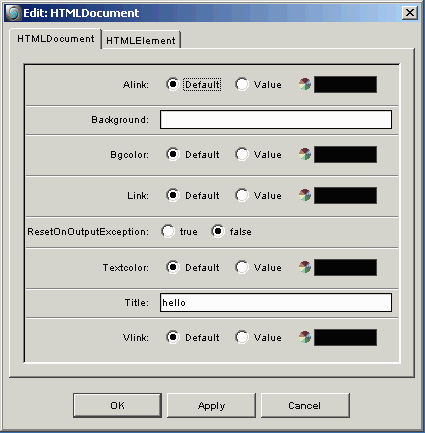
Now we need to create an HTML document to send to the browser.
In the outline view, make sure the capsule is still selected,
and from the Insert menu, go down to com.webgain.spin.html
and select HTMLDocument.
Double click on the icon for the (newly inserted) HTMLDocument, to
bring up its editor.
You can set various properties of the HTML document. Many of these are equivalent to options in the HTML <BODY> tag. At the very least, set the Title (equivalent to the HTML <TITLE> tag) to "hello". You can also set the background color, or the color of various kinds of links. When you are done, click "OK" to close this window.
Summary of Steps: HTML Document
|
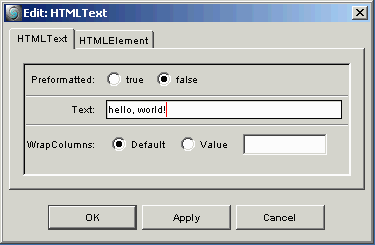
Next, insert an HTMLText actor as the child of the HTMLDocument. Double click on its icon, and change its "Text" property to "hello, world!".
Summary of Steps: HTML Text Component
|
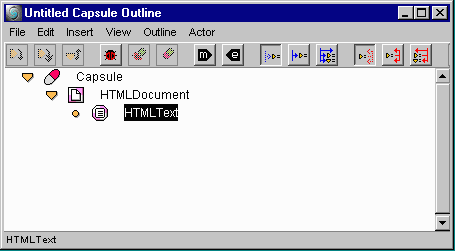
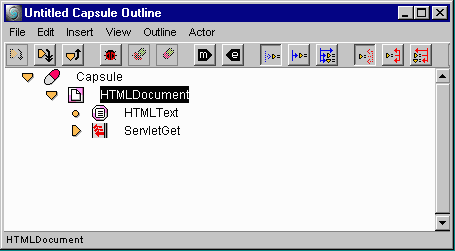
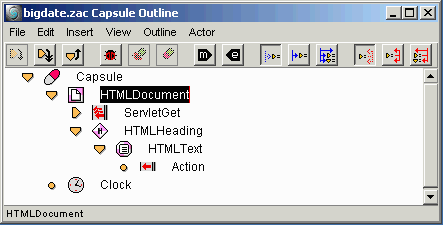
Your capsule should look like this:
As mentioned earlier, the browser interacts with the servlet using CGI and HTML. When your servlet receives a CGI "Get" request, you want to send the HTML document back to the browser. Since this is a common thing to do, you use a predefined user behavior for it. Select the HTML document, then from the insert menu under "User Behavior", select the "ServletGet" behavior. This inserts "ServletGet" as a child of the HTML document.
Summary of Steps: ServletGet behavior
|
Open up any web browser and type in the URL "http://localhost".
If you changed the ServerPort from Spin's DebugServer preferences, then you
will need to specify the port as part of the URL. The port number follows the
machine name, separated by a colon. For example, if you are using port 90, then
the URL should be "http://localhost:90"
The browser puts up a page that starts with "Spin Debug Server Results". Near the bottom of the page will be a link with the name "Servlet: /servlet/hello" (followed by a button). Click on this link (not the button), and you get a web page that says "hello, world!".
You can also invoke the servlet directly, using the URL
http://localhost/servlet/hello
(assuming you have not changed any DebugServer preferences, such as the ServerPort).
If you had not saved the capsule, the link would have appeared as "Servlet: /servlet/Capsule" instead of "Servlet: /servlet/hello". You can run a servlet even if you have not saved it (but it is always a good idea to save your work frequently).
While the web server in Spin is only really meant for testing and debugging your servlets, it really is serving them. If your machine is connected to a network, you can invoke this servlet from another machine. Just open a browser, and type in the URL, replacing "localhost" with the name of the machine that is running Spin. However, once you are done developing your servlets, you should deploy them to your web site's server (see the Spin Deployment Guide).
Go back to the outline view of the servlet, and select the Capsule. From the
Insert menu under com.webgain.spin.misc, select "Clock".
This inserts a component that provides the current time, as a child of the capsule.
Now, to cause the HTML text to display the current time, you give it a behavior.
Select the "HTMLText" component, and insert an Action behavior.
Summary of Steps: Dynamic HTML text
|
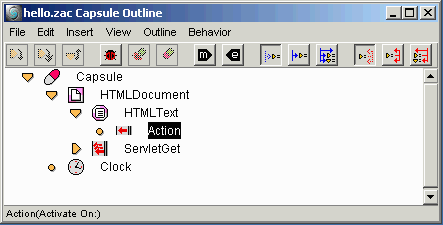
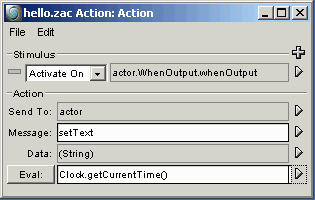
Double click on the Action behavior to open its editor.
Set the "Activate On" field to actor.WhenOutput.whenOutput,
which means to activate when the HTMLText is about to be output.
Leave the "Send To:" field as "actor".
Set the "Message:" field to "setText".
The setText message requires one argument, a string.
Click on the "Const:" button to change it to "Eval:",
and set its field to Clock.getCurrentTime() (using the
triangular arrow menus).
Summary of Steps: Dynamic HTML text
|
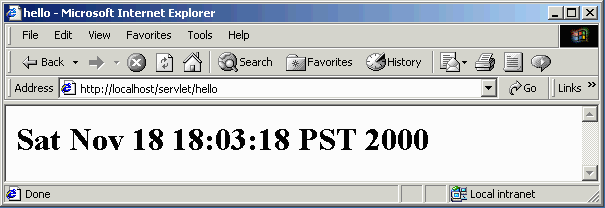
Now, click the "reload" or "refresh" button on your browser, and see the current time! Refresh your browser again, and notice that the time changes. It really is that easy to create dynamic web content with Spin.
capsule.ServletRequest.doGet.
This causes the action group to activate when
the servlet receives a CGI "Get" request.
ServletGet is an ActionGroup with two children.
Both of these children are action behaviors that activate on
parent.behavior.activated
(when its parent ActionGroup is activated).
The setContent behavior, when activated, sends to the capsule the message
setResponseContentTypeToTextHTML.
This tells the servlet that the response is going to be a text document
in HTML format.
The sendDocument behavior, when activated, sends to its actor (which is an
HTMLDocument), the message "print". You will find the "print" message in the
com.webgain.spin.html.HTMLElement submenu.
The "print" message takes a single argument, a PrintWriter.
The argument is set to getWriter(),
which gets the PrintWriter that was passed with the Get request.
This PrintWriter sends data back to your browser.
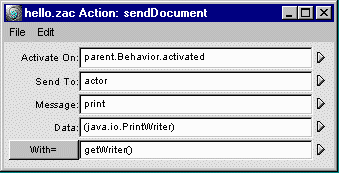
When the servlet receives a GET request, the ServletGet behavior prints the HTML document and sends it to the browser.
You can also save your servlet as a jar file, and install it on a servlet-enabled web server. You will also need to install the file spinlib.jar in the CLASSPATH of the web server. As you build more complicated servlets, they will include other files such as HTML templates and image files. You can put all of these files into a Spin project and deploy the project as a .war (web archive) file. Instructions on how to do this are in the manual "Deploying Spin Projects".
Insert an HTMLHeading actor as a child of the HTMLDocument actor. Then drag the HTMLText bean to make it a child of the HTMLHeading (you can do this by dropping the icon of the HTMLText actor onto the icon of the HTMLHeading actor, or you can use the "cut" and "paste" commands in the Edit menu).
Now click on "Reload" (or "Refresh") on your browser, and the time from the clock appears in a larger font. You can change the size of the font by changing the heading level. Just double click on the HTMLHeading actor's icon to edit it.
Summary of Steps: Heading
|
The correspondence between Spin's HTML actor beans and HTML tags is documented in Chapter 2 of the "Spin User's Guide". Spin's HTML components support all tags in HTML 3.2. If you want to use any tag that is not directly supported, you can enter it into an HTMLRaw component.
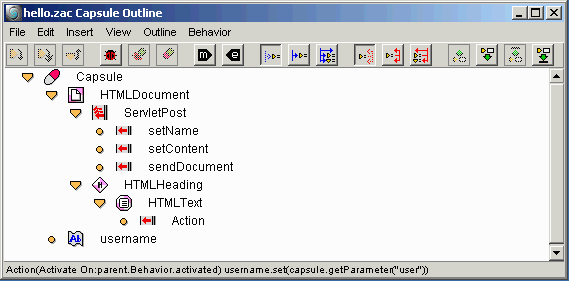
Change the name of the ActionGroup behavior from "ServletGet"
to "ServletPost" by clicking in its name (rather than its icon).
Then double click on the icon for the ActionGroup behavior and edit it so
that it is activated on capsule.ServletRequest.doPost (instead of doGet).
Select the Capsule, and from the "Capsule" menu, choose "Edit Properties". Click on the tab for "Servlet Parameters" and click on the "Add..." button. Type in "user" and click the "OK" button. Close the Capsule Properties dialog. This tells Spin that this Capsule is going to receive a servlet parameter named "user".
Delete the clock component, which is no longer needed. Add a string variable (from the "Data Item" submenu of the Insert menu) as a child of the capsule, and change its name to "username". You are going to use this variable to hold the name of the user.
Add a new action behavior as a child of the ServletPost group. New children are always added to the end of the list of children, but this action must be executed first, so move it up so it is the first child of the postAction (use the "Move Up" command in the Outline menu, the first green button in the outline view toolbar, or the Ctrl-U keyboard shortcut).
Change the name of this action to "setName". Edit the behavior so it looks like this:
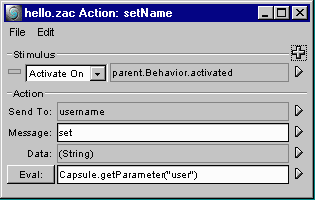
This behavior sets the value of the "username" string to be the parameter named "user" passed in with the CGI Post request. Note that since Spin knows that the capsule has a servlet parameter named "user", it automatically fills this argument in for you in the menu for the "Eval:" field. Also, note that in this behavior the alias "parent" refers to the postAction behavior (the immediate parent of setName).
Finally, double click on the Action behavior that is a child of the HTMLText component, and change the "Eval" field to be "username".
Summary of Steps: Servlet Parameter
|
Save your capsule.
From the Outline menu in the capsule outline view, select "Enable Debugging" from the Debug submenu (you can also enable debugging by clicking on the "bug" icon in the toolbar). A new window, called the Debug Console, appears after a few moments. Back in the outline view, click on the string "username" to select it, and then choose "Add Watch Variable" from the Debug submenu of the Outline menu (or the toolbar button to the right of the "bug"). The variable "username" appears in the Debug Console.
Summary of Steps: Servlet Debug Console
|
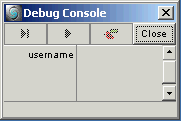
Now you are ready to test your servlet. In your browser, enter the URL http://localhost. (Remember to add the colon and port number if you selected a non-default port for the web server.) This time, instead of clicking on the link for the servlet "/servlet/hello", instead click on the button labeled "Parameters...". This allows you to type in parameters to pass with a CGI request. For the first parameter, enter "user" in the first field, and any name (say, "Spin") in the second field. Now click on the "Post" button to post the information to Spin's web server.
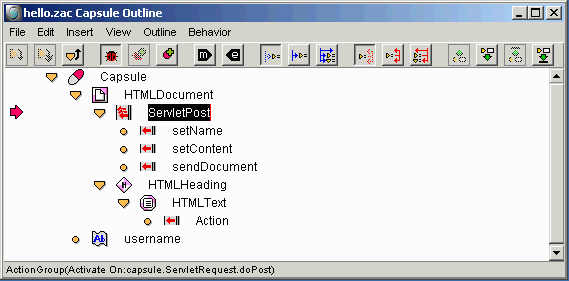
Back in Spin's outline view, a red arrow appears to the left of the ServletPost action group, indicating that execution has stopped just before executing the ServletPost behavior.
Note that the watched variable in the Debug Console has not changed, because the value of the string "username" has not been set yet. However, the single step (right arrow with vertical bar) and play (right arrow) buttons have become enabled in the debug console. In addition, a new entry has appeared in the Debug Console named "ACTIVATINGEVENT". This event contains the contents of the CGI request that invoked the servlet capsule. You can see its contents by clicking on the arrow to its left. Note the parameter "user=Spin".
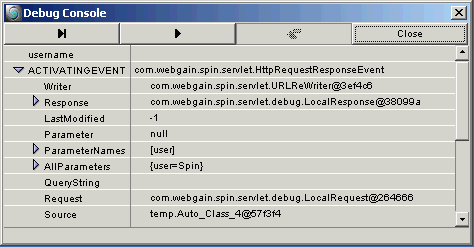
Click on the single step button in the Debug Console once to step to the setName behavior, then again to execute it, moving the red arrow to the setContent behavior. In the Debug Console, the value of "username" becomes "Spin". So we know that the value of "username" is being assigned properly.
Click on the single step button again to execute the setContent behavior, and a third time to execute the sendDocument behavior. When the document it sent, it tries to send the HTMLText component, which executes the "Action" behavior. Click on the single step button one last time to execute the "Action" behavior. Your browser should now display the message "Spin".
You are done debugging your servlet, so turn debugging off by clicking the "Close" button on the Debug Console. This also might be a good time to save your project.
Now refresh your browser. The browser will likely ask you if you want to resend the data you posted (the "user" parameter). Say yes. The browser will show "hello, Spin".
Are we finished with this servlet? Refresh your browser again. Now the browser shows "hello, SpinSpin". Ooops! The ability to test our servlet while we are building it allowed us to catch a bug. How would you fix it?
Here is your project, showing all Activation events, but only the action target for the (selected) setName behavior.
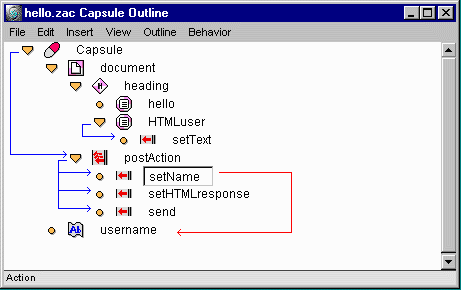
You can use this feature in conjunction with debugging and single stepping, to show activation events and action targets for each action as it is executed.
First, save the "hello.zac" capsule. Then, leave open the "hello.zac" capsule you just created, and open a new capsule in a new Capsule view. Change this capsule to be a Java servlet.
Into this new capsule insert an HTML document (from com.webgain.spin.html in the Insert menu). You can edit this actor to give it a title, if you wish.
Insert an HTMLForm as a child of the document actor and change its name to "entryForm". Double click on its icon to edit it. Set its action to "hello" and change its HttpMethod to Post. This sets it up so that when the form is submitted, it will make a Post request to the servlet named "hello".
Next, insert an HTMLText actor as a child of entryForm, and change its name to "text". Double click on it to edit it, and set its text to "Please enter your name: " (with a space after the colon).
Now insert two HTMLFormInput actors as children of entryForm, and name them "nameInput" and "button" respectively. The first of these actors, nameInput, will be a text input field. Double click on it to edit it. Set its type to "TEXT" (the default), and set its Name to "user" (recall that is the name that will be used in the Post request). If you want to enter a default name (like "Spin"), you can set it in the "Value" field.
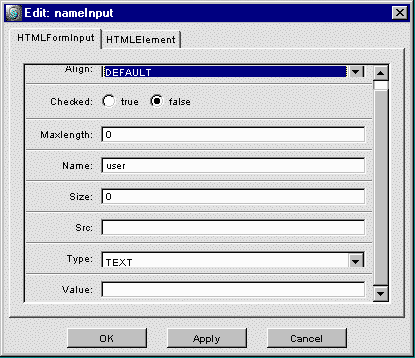
Close the editor for this actor and double click on the icon for the button actor. Change its Type to "SUBMIT" and the Value to "Proceed" (which will be used by your browser as the label of the button).
Finally, select the HTML doument, and insert a ServletGet behavior as its child.
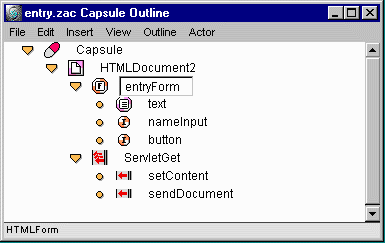
You're done. Save this servlet as "entry.zac".
Fill in your name and hit the "Proceed" button, and your browser will say hello to you.
This is a simple servlet, but basically all servlets are built this way, receiving CGI Get and Post requests and building HTML dynamically.
Note that entry.zac and hello.zac do not actually have to be two separate servlets. Since one responds to a Get request, and the other responds to a Post request, they could easily be combined into a single servlet.
Here are the two servlets merged into one:
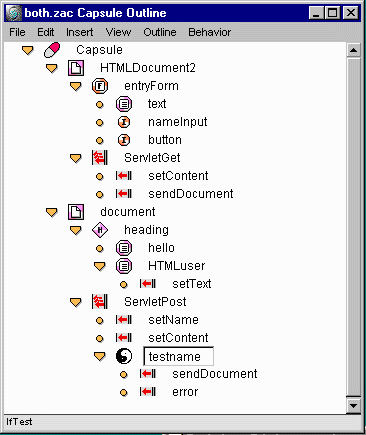
The only required change is to the HTML form "entryForm". Its "Action" property must be changed so instead of invoking a separate servlet named "hello", it invokes itself. Set this property to the filename of the merged servlet (minus the ".zac").
There is one other change in this version of the servlet.
Notice the IfText behavior at the end of the postAction group.
This behavior tests to see if the user entered a name
(by testing if name.length() == 0). If the length of the
name is not zero, then the normal send behavior is executed.
But if the length of the name is zero, then the entryForm
is resent to the user, asking them to enter their name.
This is one advantage of merging the two servlets.
JSP Templates
So far in this tutorial, all of the servlet examples have built
the entire HTML document using Spin HTML components.
This has been sufficient for our simple examples, but there
are two disadvantages to doing this in real servlets:
What you want to do is separate the static HTML from the dynamically generated HTML. Luckily, this is very easy to do in Spin. You will store the static HTML in a regular HTML file, and (of course) generate the dynamic HTML from a Spin capsule. Since we are now building an application that has more than one file in it, this is a good time to introduce Spin projects.
When you start Spin, you get an empty project. Spin projects are useful for several things:
You are going to build a project that contains two files, an HTML file called
"date.html" and a capsule called "date.zac". The capsule
is a Spin servlet, which uses the HTML file as a template containing mostly
static HTML, but also a bit of dynamic content. Just to make things easier,
you should create a directory somewhere to hold your project. This directory
will hold all the files in the project, and the project (.zap)
file itself.
First, create the following HTML file (using your favorite HTML editor, such as Notepad, vi, or Dreamweaver):
<%@page language="java" buffer="4kb" isErrorPage="false" %>
<%@taglib uri="/WEB-INF/lib/SpinTags.jar" prefix="spin" %>

<html>
<head>
	<title>Tutorial -- date</title>
</head>

<body>
    <b>
        The current date is:
        <spin:call method="date"/>
    </b>
</body>
</html>
Save this file as "date.html" in your directory. The actual suffix is not important to Spin, but if you use ".html" then you can edit it more easily. From the Spin Project window, select "Project > Add..." and add this file to your project. Save the project itself (File > Save) in the same directory as "date.zap".
There are three tags in this file that are a bit unusual. These are Java Server Page (JSP) tags. The first line of the file sets up that this is a JSP file, and the second line accesses a Spin-specific JSP tag library. This tag library lets you insert dynamic content into your templates without writing complicated Java statements. Of course, you can still use any JSP tag — including those that use Java — if you wish.
Four lines from the bottom of this file is a line that contains
the following tag: <spin:call method="date"/>.
This is a Spin JSP tag that calls a method named "date" on a Spin capsule.
In this case, we are not specifying which Spin capsule, so it assumes that
you are calling the capsule that invoked this template.
Now you will build the capsule that uses this HTML template file.
In this section, you will build a Java servlet that uses the HTML template that we defined in the last section. The overall structure of this web application is a servlet that is invoked by the web server, which then invokes a template (containing JSP tags) to generate the HTML that is sent back to the browser. This is a common pattern for combining servlets and JSPs.
Open a new capsule, and change the type of the capsule to "Java Servlet". Insert into the capsule a JSPTemplate component (from "com.webgain.spin.html in the Insert menu). With the JSPTemplate selected, insert a ServletGet behavior (from "User Behavior" in the Insert menu).
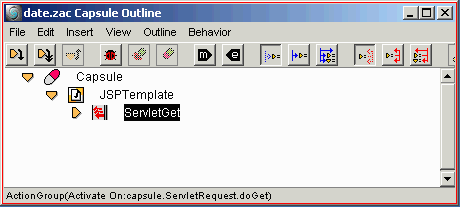
Next, tell the JSPTemplate component what file to use as a template. Double click on the JSPTemplate component, and set its "Path" property to "date.html". You do not need to give an absolute path to this file, because its absolute path is defined in the project.
What you have defined so far is a servlet that responds to a Get request by sending the template file date.html back to the browser. But this template file contains a spin:call tag that calls a method named "date". You have to define the "date" method.
Make sure the capsule is selected and insert an action behavior. Rename this action to be "print on date" (behaviors are allowed to have spaces in their names). Insert two children under the "print on date" behavior. First, insert an HTMLText component and name it "dateText". Second, insert a clock component (from com.webgain.spin.misc in the Insert menu). Finally, insert an Action behavior as a child of "dateText" and name it "setText".
Double click on the "print on date" behavior to open its editor. For this behavior's stimulus, define a new method on the capsule, named "date". Click on the triangle to the right of the "Activate On" field, then click on "capsule", then click on "Capsule", then click on "New Method...".
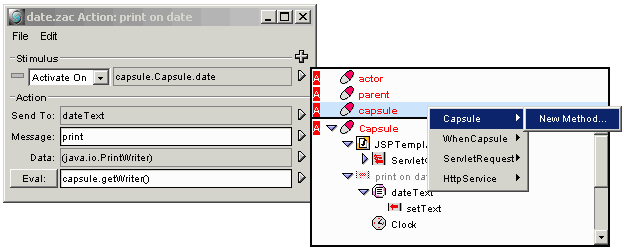
In the dialog that comes up, fill in the "Activate On" field to "date" and click "OK".
Going back to the "print on date" behavior, set the "Send To" field to "dateText", the Message field to "print", and the "Eval" field to "capsule.getWriter()". This says, when the "date" method is called on the capsule, print the "dateText" component.
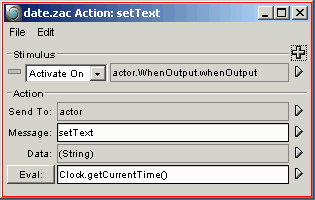
Finally, open up the "setText" behavior and set it so that when its actor is about to be output, it sets its actor's text to the the current time (from the clock). Like so:
Go back to the outline view and click on the button in the tool bar that contains an "m" in a black arrow. This shows which behaviors are activated on method calls on the capsule. It is also handy to turn on the "Show Activation Events" and "Show Action Targets" buttons.
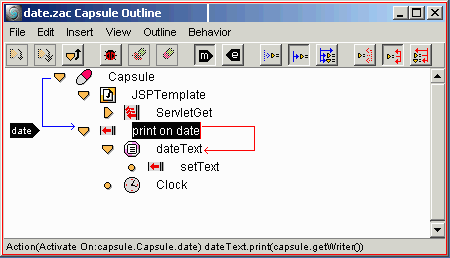
Go to the Capsule view File menu and Save your capsule as date.zac.
Open a browser and run this servlet, and your browser should show "The current
date is: Fri Oct 27 16:49:51 PDT 2000" in bold text. You can edit the file "date.html"
in some editor, to make this page as fancy as you wish.
JSP Capsules
[This section is still under construction.]
Database Access
[This section is still under construction.]
Enterprise JavaBeans
Under construction. For now, please see the "SimpleBank Tutorial".
26 October 2000 — wm