Enterprise JavaBeans (EJBs) are Java server side components. They are generally used as middleware components in large distributed applications. Spin can work with any EJB, as long as that EJB is compliant with your EJB application server.
Despite their similar names, Enterprise JavaBeans and JavaBeans are very distinct and different. JavaBeans and Enterprise JavaBeans are both types of components, but do not share a programming or usage model. JavaBeans are not Enterprise JavaBeans and Enterprise JavaBeans are not JavaBeans. JavaBeans tend to be visual, client side components, though they can be non-visual. Enterprise JavaBeans are server side, non-visual components. See the “Spin User's Guide” for a more detailed discussion of EJBs.
This example uses the preconstructed SimpleBank Entity Bean, which talks to a PointBase Database to get information about bank accounts. To provide access to this information from anywhere, you will also build a servlet that calls SimpleBank and formats the results for display in a web page.
EJBs cannot be run from a regular Java VM. They must be run within an EJB Application Server.
spin The directory where Spin is installed on your machine
You are now ready to make the SimpleBank EJB accessible to Spin.
Run Spin.
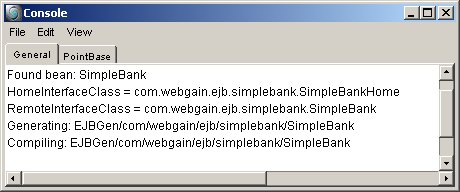
When Spin finishes loading, you see a Project window and a Console window. From the File menu in the Project window, choose “Create Spin EJB…”. In the Open dialog box that appears, navigate to the SimpleBank.jar file, spin\exampleservlets\Bank\EJB\SimpleBank.jar, select it, and click “Open”. Spin copies the .jar file to the spin\beans\ejb folder and processes any EJBs in the JAR into a format it can use. Since this JAR only contains one EJB, only one bean is processed. Information regarding the status of the process is output to the Console window. If the processing is successful, you see a message that the bean was found and successfully read by Spin:
Summary of Steps: Importing a Jar Containing EJBs into Spin
To test servlets in Spin, you need a web server. Since you will use a servlet to call your EJB, make sure the Spin web server is enabled. From the Edit menu in the Project window, select “Preferences…”. In the Preferences Dialog Box, select the DebugServer tab. Change the WebServerEnabled radio button at the bottom of the dialog box to “true”. When you are finished, your Preferences window should look something like:

Summary of Steps: Enabling the Web Server
1. Edit> Preferences …
2. Select the DebugServer tab
3. Set WebServerEnabled to true
The BankTransactions example in this tutorial uses the PointBase database server. To enable PointBase in Spin, select the General tab in Edit Preferences. Make sure that PointBaseServerLoadsAtStart is set to true.

Summary of Steps: Enabling PointBase in Spin
For the example in this tutorial, you will use the jBoss EJB server that ships with Spin. To enable the jBoss server, select the EnterpriseJavaBeans tab in Edit Preferences. Set JBossEJBServerLoadsAtStart to true. Your window should look like this:

Close the Edit Preferences window.
Summary of Steps: Configuring Spin to use jBoss
1. Select the EnterpriseJavaBeans tab
4. Set jBossEJBServerLoadsAtStart to true
5. Click “Close” to close the window
You have just configured Spin to load several servers when it starts. Restart Spin now so those servers are available for the rest of this tutorial.
The capsule you will create now is a servlet that has the job of retrieving a bank balance from a PointBase database, given an account number. You will use two html documents to achieve this. The first prompts a user for an account number. The second displays the balance, or an error if an account with the given account number does not exist.
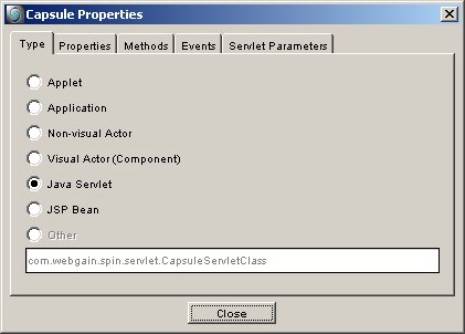
In the Project window, choose File>New Capsule. This capsule is going to be a servlet, so change its properties to reflect this. Right click (command-click on the Macintosh) on the capsule, choose Edit Properties, under the Type menu, pick “Java Servlet”.
Close the Capsule Properties dialog.
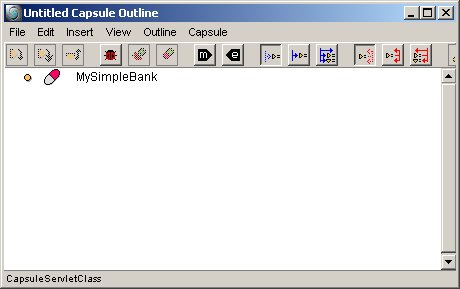
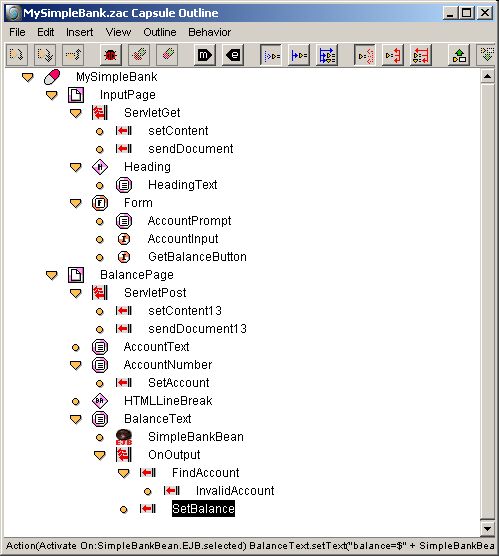
Now rename the capsule to “MySimpleBank” so we can refer to it by name. Your Capsule Outline should now look like this:
Summary of Steps: Creating a Servlet Capsule
1. File>New Capsule
2. Right click on the Capsule icon and select Edit Properties
3. In the Type tab, choose JavaServlet
4. Click “Close”
5. Choose the Capsule again
6. Change the name of the Capsule to “MySimpleBank”
The first element of MySimpleBank is going to be an HTMLDocument with an area to capture an account number input by a user. As a child of MySimpleBank, insert an HTMLDocument and rename it “InputPage”. Then change the Title of this document to be “Bank Balances”.
Summary of Steps: HTMLDocument Component
1. Select MySimpleBank
2. Insert com.webgain.spin.html>HTMLDocument
3. Change the name of the inserted HTMLDocument to “InputPage”
4. Double click InputPage
5. Set Title to “Bank Balances”
6. Click “OK” to close the window
When your servlet receives a “Get” request, it should respond by sending the InputPage back to the browser. You are not quite finished building the page yet, but can go ahead and add the “ServletGet” behavior. Insert it as a child of InputPage. From the Insert menu, select User Behavior, and from the submenu that pops up, choose “ServletGet”. Nothing else is required for setting up the Get behavior.
Summary of Steps: Adding a ServletGet Behavior
1. Select InputPage
2. Insert>User Behavior>ServletGet
Next, create the body of the document to be sent when the servlet receives a get request. The first thing to add is a heading for the page. Select InputPage and insert an HTMLHeading, renaming it “Heading”. To reduce the text to a smaller font, change the heading level to “2” in the Properties for Heading. Text to display in this heading would be useful, so add an HTMLText component, named “HeadingText”, as a child of Heading. Change HeadingText’s text to be “Bank Balances”.
Summary of Steps: Adding the Heading
1. Select InputPage
2. Insert>com.webgain.spin.html>HTMLHeading
3. Change the name of HTMLHeading to “Heading”
4. Double click on Heading’s icon
5. In the window that pops up, change the value of Heading to “2”
6. Click “OK” to close the window
7. Select Heading
8. Insert>com.webgain.spin.html>HTMLText
9. Rename HTMLText to HeadingText
10. Double click on HeadingText’s icon
11. Set the value of Text to “Bank Balances”
The next figure shows what your capsule should look like at this point. This is a good time to save your work. A good place to save this is in the examples directory. Name the file MySimpleBank.zac.

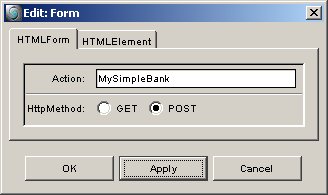
Since your first page needs to take some input from a user, add an HTMLForm component to the InputPage. Select InputPage, insert an HTMLForm and rename it “Form”. You also need to edit Form’s properties. Set the Action to “MySimpleBank”, which is this capsule/servlet, and set the HTTPMethod to “Post”.
Summary of Steps: Inserting an HTMLForm component
1. Select InputPage
2. Insert>com.webgain.spin.html>HTMLForm
3. Change the name of the inserted HTMLForm to “Form”
4. Double click on Form
5. Set Action to be “MySimpleBank”
6. Choose “POST” to be the HTTPMethod
7. Click “OK” to close the window
The user needs to know what to enter on the page. Add an HTMLText component to Form and rename it “AccountPrompt”. Then edit its Text property to be “Enter Account Number : “. Notice the spaces. While they are not necessary, they make the format easier to read. This text will let the user know what to input into the field that will be next to it.
You also need a place for the user to enter an account number. Select Form again, insert an HTMLFormInput component, and rename it “AccountInput”. Some of the properties of this element need to be changed. For formatting reasons, set the field size to be “20”. Account numbers are expected to have a maximum of 10 digits, so the max length should be “10”. Also, configure the name of the parameter that is input in this field. Set the Name property to be “accountNumber”. This will be used later as a parameter, so correct spelling is important.

Summary of Steps: Adding the Entry Field:
1. Select Form
2. Insert>com.webgain.spin.html>HTMLText
3. Rename the HTMLText component just added to be “AccountPrompt”
4. Double click on AccountPrompt’s icon
5. Set the Text property to be “Enter Account Number : “
6. Click OK to close the window.
7. Select Form again
8. Insert>com.webgain.spin.html>HTMLFormInput
9. Rename the HTMLFormInput just added to be “AccountInput”
10. Double click on AccountInput’s icon
11. Set Size to “20”
12. Set Maxlength to “10”
13. Set Name to “accountNumber”. The spelling is important. It is a parameter that will be used later.
Click ok to close the Edit: AccountInput dialog.
So that the user may submit the information entered, you will next add a “Submit” button as a child of Form. Select Form, add an HTMLFormInput component, and rename it “GetBalanceButton”. Change its “Type” to be “Submit” and its value to “Get Balance”.

Summary of Steps: Adding the Submit Button
1. Select Form
2. Insert>com.webgain.spin.html>HTMLFormInput
3. Rename the HTMLFormInput component just added to “GetBalanceButton”
4. Double click on GetBalanceButton’s icon
5. Set Type to be “SUBMIT”
6. Set Value to “Get Balance”
7. Click OK to close the window
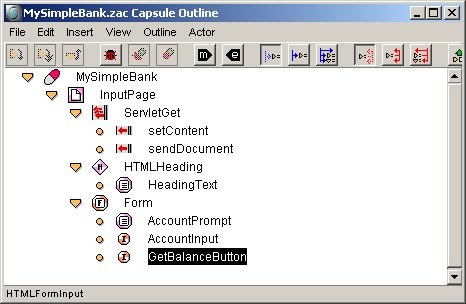
This is what your capsule should look like at this point:
You can go ahead and try running the servlet by opening a browser on http://localhost and clicking on the link to servlet/MySimpleBank to verify the layout of the Input Page you just created. If you click on “Get Balance” a blank page will appear, since the servlet does not have any instructions yet as to what to do with a post request.
The reply after the Input Page has been submitted should contain the bank balance, or an error message if the account number was not found, or if another error occurs. Before you can use the EJB, you need to set up the page on which its information will be displayed.
Creating the second page
When the servlet receives a Post request from the form submission on the InputPage, a second HTML page will be constructed with information based on what was entered in the InputPage. To do this, add an HTMLDocument as a child of MySimpleBank and rename it to BalancePage. Edit its Title to be “Bank Balances”.
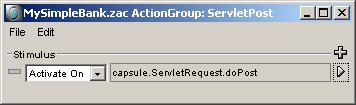
Next, create a ServletPost User Behavior. As a child of BalancePage, insert a User Behavior, “ServletGet”, and rename it “ServletPost”. Change its Activate On Property to be “capsule.ServletRequest.doPost”. That’s all you need to do to create a ServletPost from a ServletGet..
Summary of Steps: Adding the BalancePage and the ServletPost behavior
1. Select MySimpleBank
2. Insert>com.webgain.spin.html>HTMLDocument
3. Rename the HTMLDocument component just added to “BalancePage”
4. Double click on BalancePage’s icon
5. Set Title to “Bank Balances”
6. Click OK to close this window
7. Select BalancePage
8. Insert>User Behavior>ServletGet
9. Rename the ServletGet behavior just added to “ServletPost”
10. Double click on ServletPost’s icon
11. Change the value of Activate On: to “capsule.ServletRequest.doPost”
12. Close the window
Next, build the text of BalancePage to be sent when a Post request is received. The text of the page should include the account number entered on the first page and the balance of that account. If the account number was invalid, an error message should be displayed.
Add an HTMLText component to BalancePage and rename it “AccountText”. Edit the Text property of AccountText to be “Account : “. Notice the space at the end of the String.
Now you need to redisplay the account number. Add another HTMLText component to BalancePage and rename it “AccountNumber”. There is no need to modify its properties. You will use an Action to set its text.
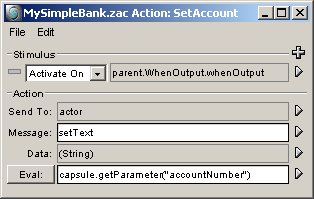
As a child of AccountNumber, insert an Action and rename it SetAccount. Double click on SetAccount’s icon to edit its properties. Set Activate On to “parent.WhenOutput.whenOuput”. This means that when AccountNumber is output, this SetAccount is activated. Set SetAccount to Send To “actor” the Message “setText” with the value (Eval: parameter) “capsule.getParameter(“accountNumber”)”. This retrieves the parameter accountNumber from the capsule. accountNumber is set by submittal of the form data on the InputPage.
Put a line break between this information and the account balance. Add an HTMLLineBreak, as a child of BalancePage, after AccountNumber.
Summary Of Steps : Redisplaying the Account Number
1. Select BalancePage
2. Insert>com.webgain.spin.html>HTMLText
3. Rename the HTMLText component “AccountText”
4. Double click on AccountText’s icon
5. Change the value of Text to “Account : “. Notice the space at the end.
6. Click OK to close this window
7. Select BalancePage again
8. Insert>com.webgain.spin.html>HTMLText
9. Rename the HTMLText component “AccountNumber”
10. Select AccountNumber
11. Insert>Behavior>Action
12. Rename the Action “SetAccount”
13. Double click on SetAccount
14. Set Activate On: to “parent.WhenOutput.whenOutput”
15. Set Send To: to “actor”
16. Set Message: to “setText”
17. Click on the Const: button to change it to “Eval:”
18. Set Eval: to be “capsule.getParameter(“accountNumber”)”
19. Select BalancePage
20. Insert>com.webgain.spin.html>HTMLLineBreak
So far, you have simply redisplayed the account number that the user entered on the first page. You can check this by running the servlet.
Next add an HTMLText component to display the bank balance that the SimpleBank EJB will return. Insert an HTMLText element as a child of BalancePage and rename the new element BalanceText.
Spin wraps access to EJBs for you, so if you are used to writing code to use EJBs, you’ll notice that this feels a little different. EJB components that are added to Spin have the Home and Remote interface methods accessible from the single EJB icon in the Outline view. When using a “find” method on an Entity Bean that returns more than one Remote Interface, Spin provides methods to iterate over the references returned.
Now you are ready to add the SimpleBank EJB. Select BalanceText, then from the Insert menu select EJBGen.com.webgain.ejb.simplebank.SimpleBank. Rename it SimpleBankBean in the Capsule Outline (Notice the new EJB icon is different than the other icons).
Next, edit the properties of the EJB in order to ensure that Spin can locate it correctly on jBoss. Set SpinEJBContextFactory to “org.jnp.interfaces.NamingContextFactory” if it is not already set. This is the JNDI factory that should be used to find a bean in jBoss. Outside of this example, the value of this field will change based on the EJB Application Server you are using.
Change SpinEJBHome to “SimpleBank”. This is the “home name” of the EJB, or the name that is used to look up the bean using JNDI.
Finally, set the SpinEJBURL to “127.0.0.1”. jBoss is running on our local machine, so the IP address should point to localhost.

Summary of Steps: Adding SimpleBank EJB to the capsule
1. Select BalancePage
2. Insert>com.webgain.spin.html>HTMLText
3. Rename the HTMLText component to “BalanceText”
4. Select BalanceText
5. Insert>EJBGen.com.webgain.ejb.simplebank>SimpleBank
6. Rename the SimpleBank component “SimpleBankBean”
7. Double click on SimpleBankBean’s icon
8. Set SpinEJBContextFactory to “org.jnp.interfaces.NamingContextFactory”
9. Set SpinEJBHome to “SimpleBank”
10. Set SpinEJBURL to “127.0.0.1”
11. Click “OK” to close the window
At this point, the bean is accessible. You will now add an Action Group to handle the access. For this tutorial, you will provide handling for two possible scenarios. If a user successfully accesses an account, display the account balance. If an access attempt is unsuccessful, display an error message. For this example, assume that the only possible error is entry of an invalid account number, so any error encountered generates the error message that the account was invalid.
Insert an Action Group as a child of BalanceText and rename it “OnOutput”. Set OnOutput to Activate On “actor.WhenOutput.whenOutput”. As a child of OnOutput, add an Action and name it FindAccount. This action will call a method on SimpleBankBean to find the account that was entered on the InputPage. Set FindAccount to Activate On “parent.Behavior.activated”. Also set it to Send to “SimpleBankBean” the Message “findByPrimaryKey” with the value “capsule.getParameter(“accountNumber”)”.
This will cause SimpleBankBean to look in the database for an entry whose account number matches the argument it was passed. If no matching entry is found, an exception will be thrown. Since account number is the primary key of the database, only one account is expected to be found for any valid account number.

In the case that an exception is thrown, this example assumes that a matching account was not found. To handle this case, add an Action called “InvalidAccount” as a child of FindAccount. Set it to Activate On “parent.Exception.activated” and Send To “BalanceText” the Message “setText” the Const: “is an invalid account”.

Summary of Steps: Calling findByPrimaryKey on SimpleBankBean
1. Select BalanceText
2. Insert>Behavior>Action Group
3. Rename the Action Group component “OnOutput”
4. Double click on OnOutput’s icon
5. Set Activate On: to “actor.WhenOutput.whenOutput”
6. Select OnOutput
7. Insert>Behavior>Action
8. Rename the Action “FindAccount”
9. Double click on FindAccount’s icon
10. Set Activate On: to “parent.Behvaior.activated”
11. Set Send To: to “SimpleBankBean”
12. Set Message: to “findByPrimaryKey”
13. Click on the Const: button to change it to “Eval:”
14. Set Eval: to “capsule.getParameter(“accountNumber”)”
15. Select FindAccount
16. Insert>Behavior>Action
17. Rename the Action component “InvalidAccount”
18. Double click on InvalidAccount’s icon
19. Set Activate On: to “parent.Exception.activated”
20. Set Send To: to “BalanceText”
21. Set Message: to “setText”
22. Set Const: to “is not a valid account”
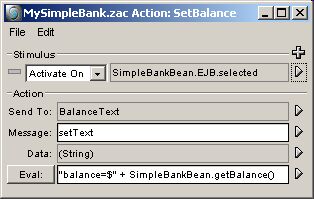
Now that you have provided handling for potential errors, you can proceed with handling valid entries. If a database entry was found for the account number input, your next step is to ask SimpleBankBean for the balance of the account. To do this, add an Action that is a child of OnOutput named “SetBalance”. Set SetBalance to Activate On “SimpleBankBean.EJB.selected”.
Since actions in action groups are executed in order, FindAccount will have already been called. Set SetBalance to Send To “BalanceText” the Message “setText” where the text is "balance = $ " + SimpleBankBean.getBalance()”. The call to SimpleBankBean.getBalance() is a call to a remote reference of a SimpleBankBean that currently represents that data we are interested in.
You are now done building the capsule! Save your work.
Summary of Steps: Adding the Call to getBalance
1. Select OnOutput
2. Insert>Behavior>Action
3. Rename the Action component “SetBalance”
4. Double click on SetBalance’s icon
5. Set Activate On: to “SimpleBankBean.EJB.selected”
6. Set Sent To: to “BalanceText”
7. Set Message: to “setText”
8. Click on Const: to change it to “Eval:”
9. Set Eval: to "balance = $ " + SimpleBankBean.getBalance()”.
10. Save your work.
If you’ve followed the instructions, the web server that ships with Spin is currently running and jBoss is running as well.
Start up a web browser,
Set the address to http://localhost.
The following screen appears:
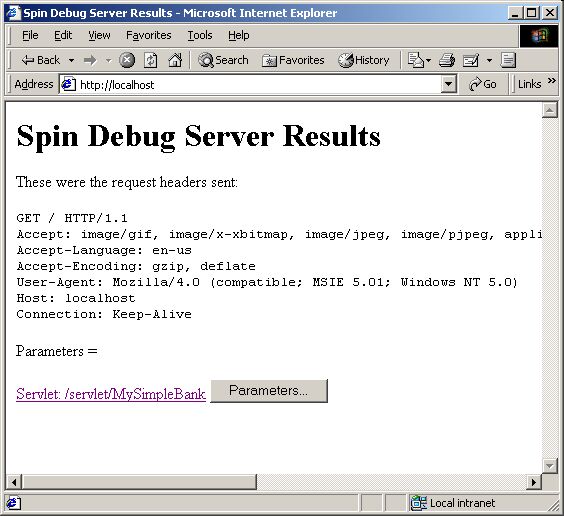
Click on the link to /Servlet/MySimpleBank
If the configuration has been set up correctly and the capsule has no errors, you should see the following screen:

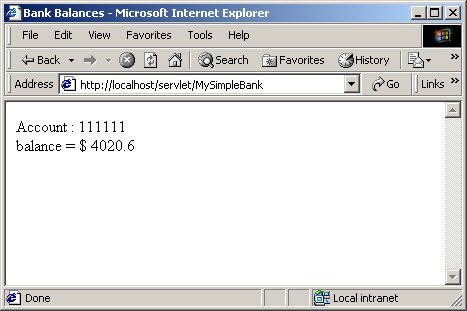
Some valid account numbers are : 111111, 123456, 000001, and 987654. Enter one of these and click on the submit button. You should see something similar to the following screen:
If you enter an invalid account number, you should see an error message. If anything is wrong with the set up of the example you will see the error message, so if you have entered a valid account number and are getting the invalid account message, some things to check are:
1. jBoss has been started and SimpleBank was deployed without any exceptions or errors.
2. jBoss was able to connect to the PointBase database
3. accountNumber was spelled correctly as a parameter in all areas of the capsule.
4. Gets and Posts have been set correctly and are calling the appropriate methods.
5. Just to make sure…you entered a valid account number.
You have now completed this tutorial! To see a more complex Spin project which
uses EJBs, see
Spin/exampleservlets/icdvd/icdvd.zap.