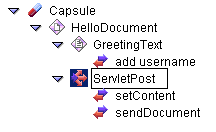
hello.zac capsule in AppComposer. Your editor should look similar to this:

In the last lesson you created a simple servlet capsule that sent HTML-formatted output to a browser. Now you are going to modify the capsule you built so that it sends customized output, depending on information given to it by the user. This servlet asks the user their name, and then greets them with it.
If you did not create and save a capsule in the previous lesson, you can open the capsule AppComposer/docs/manuals/tutorials/resources/helloServlet.zac to begin this exercise.
The goals for this section include:
In order to make the servlet interactive, you need to edit the servlet capsule so that it can receive input from a browser. The servlet capsule has to accept that input, process it, and send the appropriate output back to the user. Once you have edited the servlet so that it can do all this, you can use some of AppComposer's testing tools to verify that you set up the servlet correctly.
hello.zac capsule in AppComposer. 
You have edited the servlet properties so that the servlet capsule expects a parameter called username. This parameter will come from an HTML form field that the user fills in.
You need to edit GreetingText so that it can add the content from username to the HTML greeting it sends in reply to the user's form submission.
GreetingText now has half of its message. It still needs to get the user's name from the username parameter posted by the client browser. You need to add a behavior to GreetingText so that it can find the user's name and add it to its greeting.
Behaviors -> Action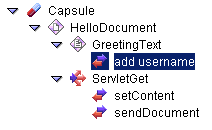
So far, the add username behavior does not actually do anything. If you look in the Details pane, you see that most of its fields are empty. You need to define what add username does, which is taking the value of the username parameter and adding it to GreetingText.
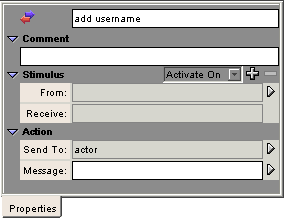
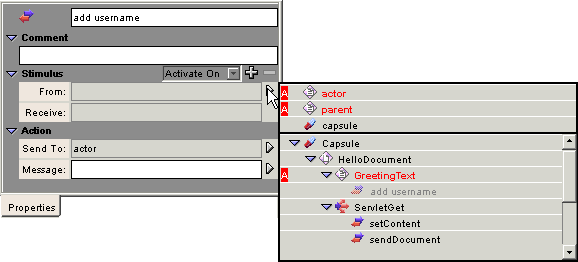
 WhenOutput
-> whenOutputusername parameter
to the capsule parameter list, so it automatically includes it in your list
of options.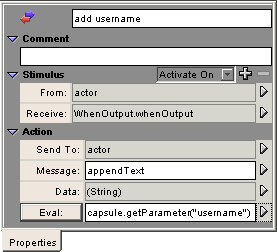
You have just created a new behavior. As you can see, AppComposer makes this very easy. AppComposer provides you with choices that help build each field you set, and you can manually enter or edit the field contents. As long as you define all of your methods, parameters and variables somewhere in the capsule, you can use them to define behaviors.
As a result of this behavior, GreetingText can look at the content of the username parameter and add it to the end of its Hello, greeting. But so far username has no value. The servlet will receive this value from an HTML form, so you need to modify the ServletGet behavior to be able to receive it.
ServletGet responds to HTML GET requests from browsers.
But since the data from the user will come in an HTML form, you need to edit
ServletGet so that instead of responding to GET requests
from a browser, it can respond to POST requests. Most HTML forms
use POST requests to send their data to a server.

You have added all of the necessary behaviors and parameters to your servlet capsule. You are ready to test it now to ensure that it all works as you want it to. But how can you test this without an HTML form for a user to fill out? You have not created a form for this yet.
AppComposer's debug web server provides a tool for just this situation. You can use it to test parameters that a user or another servlet might pass to this one, even if you have not yet created an HTML front-end or the other servlets it needs to work with. The next section walks you through using the debug web server to test servlet parameters.