

Creating the SimpleBank EJB Servlet
The capsule you create for this exercise is a servlet. It has the job of talking
to an EJB that takes an account number and retrieves a bank balance from an HSQL
database.Ý You will build two HTML documents to achieve this.Ý The first prompts
a user for an account number. The second displays the balance, or an error message
if an account with the given account number does not exist.
To create a new capsule:
- From the File menu, choose New Capsule -> Servlet.Ý
An untitled capsule outline appears
- Select
Capsule in the outline and rename it MySimpleBank.
For this tutorial, you will pass a parameter to the capsule. If you define
it explicitly now, AppComposer will provide you with easy access
to this parameter for debugging and using in behaviors.
- Scroll down in the Details pane until you see the field labeled ServletParameters.
- Click the Plus
 icon to add a new parameter.
- Enter accountNumber in the dialog.
- Click OK.
Adding the Login Page
The first element that the MySimpleBank servlet needs is an HTML document with
an area to capture an account number input by a user.Ý When the user first goes
to the page, the servlet should provide a form in which to enter the account
number and a button to submit the account number to the server.
To add an HTML document:
- Select MySimpleBank.
- From the Palette, insert an HTMLDocument.
Html -> HTMLDocument
- Change the name of HTMLDocument to InputPage.
- Look in the Details pane for InputPage.
- In the Comment field, enter: This page asks a user for their account
number.
- Set Title to Account Login. You may have to scroll or resize
the Details pane to see the Title field.
When your servlet receives a GET request from a browser, it should
respond by sending the InputPage back to the browser.Ý Even though you are not
finished building the page yet, you can go ahead and add the behavior that responds
to a browser's GET request.Ý ServletGet is preconfigured to send messages
to its actor, so make it a child of InputPage.
To enable InputPage to print:
- Select InputPage in the outline.
- Insert -> Saved Group -> ServletGet
Next, you need to create the body of the InputPage. When an HTML actor is inserted
as a child of another HTML element, it is nested in that element. For instance,
if your capsule contains an HTMLFontStyle actor and you add an HTMLText to it
as a child; the HTMLText takes on the font defined by its parent, the HTMLFontStyle.
In AppComposer, setting up child HTML elements corresponds to nesting
HTML tags, and has the same effects.
You will insert an actor that sets the HTML formatting to the heading style,
and then you will add a text actor as a child of the heading, so that the text
inherits the formatting.
To add the heading:
- Select InputPage in the outline.
- From the Palette, and an HTMLHeading actor.
Html -> HTMLHeading
- Change the name of HTMLHeading to Heading.
- In the Details pane, change the value of Heading to 2.
This is equivalent to inserting an <H2> tag.
- Add an HTMLText actor as a child of Heading.
Insert -> Html -> HTMLText
- Rename HTMLText to HeadingText.
- In the Details pane, set the value of Text to Account Login.
Since HeadingText is a child of an actor that corresponds to an <H2>
HTML tag, the phrase Account Login, which is the value of Heading
Text, will be sent to the browser enclosed in <H2> tags,
and will display as a second-level heading.
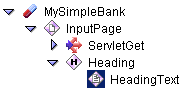
At this point, your capsule outline should look like this:Ý

This is a good time to save your work in the composer/examples
directory.Ý Name the capsule MySimpleBank.zac. You can run the
capsule at this point by choosing Run from the File menu.
The browser should display an HTML page with the text "Account Login".
When the user puts information into the InputPage, you want the page
to post the information to the servlet named MySimpleBank.
You need to add an HTMLForm to this page that accepts the information from the
user and posts it to the servlet.
To insert an HTMLForm:
- Select InputPage in the outline.
- From the Palette, insert an HTMLForm actor.
Html -> HTMLForm
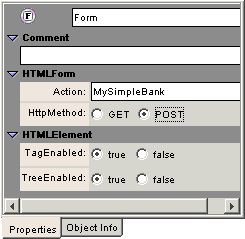
- Change the name of the inserted HTMLForm to Form.
- Set Action to: MySimpleBank. This is the target servlet
for the POST request.
- Select POST for the HTTP Method.

The user needs to know what to enter on the page, so add some text that will
be the prompt for the input field. This text lets the user know what to put
into the field next to it.
To add the form prompt:
- Select Form in the outline.
- Insert an HTMLText actor
Html -> HTMLText
- Rename the HTMLText actor to AccountPrompt.
- In the Details pane, set the Text property to Enter Account Number
:
Include spaces on either side of the colon so that it will be easier for the
user to read.
The form needs a field to capture the account number that the user inputs.
The name of the field also represents the name of the parameter that the form
will pass to the servlet.
You should also make sure that the field size is an appropriate size to display
on the page and that the user cannot enter too many digits for their account
number. This can be a first layer of defense in error checking.
To add the entry field:
- Select Form.
- Insert an HTMLFormInput actor.
Html -> HTMLFormInput
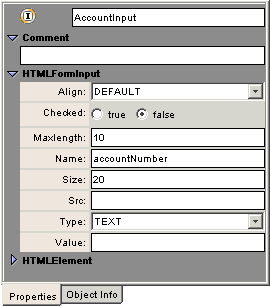
- Rename the HTMLFormInput to AccountInput.
- Edit the fields to match the following:

- Set Size to 20. This is the display size of
the field.
- Set Maxlength to 10. This is the maximum number
of characters the user can enter.
- Set Name to accountNumber.Ý The spelling and
capitalization must exactly match the parameter you defined in the capsule
earlier.
You need to set up the servlet so that when the capsule receives the POST
request, it looks for a parameter named accountNumber and uses the
value associated with that parameter to communicate with the EJB.
So that the user may submit the information entered, you need to add a Submit
button as a child of Form.Ý When the user clicks the Submit
button, the Form posts the accountNumber the user enters in
the AccountInput field to the servlet.
To add the Submit button:
- Select Form.
- Add an HTMLFormInput actor as a child of Form.
Html -> HTMLFormInput
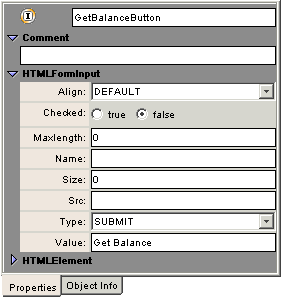
- Rename the HTMLFormInput actor to GetBalanceButton.
- In the Details pane, set Type to SUBMIT.
- Set Value to Get Balance.
Get Balance is the text that the button displays.

This is what your capsule outline should look like at this point:

Look at the capsule outline. So far it contains actors and behaviors that generate
the InputPage HTML file. InputPage has a heading and a form area with a prompt,
an input field, and a button that posts the form. The ServletGet behavior allows
the servlet to send InputPage to a browser.
After you save your work, go ahead and run the servlet by choosing Run
from the File menu. Verify the layout of the input page you just created.Ý
If you click on Get Balance, a blank page appears, since the servlet
does not have any instructions yet as to what to do with a POST request.
In the next lesson, you will create a response page that generates and displays
the data returned in response to this form page.


© 2003 DigiSlice Corporation


