This tutorial takes you through the process of using AppComposer to create a medium-sized dynamic web application. The goal of this tutorial is to produce a web site that allows customers of a mutual fund company to view the contents of their fund accounts and buy and sell funds online. Your role, as the composer of the application, is to integrate various resources from the mutual fund organization into a unified web application.
This tutorial assumes you have a basic understanding of how to work with AppComposer. This tutorial should not be your first hands-on experience with AppComposer, since it does not explain in detail how to do many of the common operations used in building applications. For a good introduction to basic operations, see the AppComposer Introductory Tutorial.
On the one hand, as the composer of the application, you have access to a graphics department that is skilled in producing high-quality HTML and JSP pages. These web page designers are responsible for the look and feel of the web site. On the other hand, you have an information services department that is responsible for maintaining the mutual fund database system that was in place long before the need for an Internet-based application came into being. The IS department has created some Enterprise Java Beans (EJBs) to provide access to the legacy database data for the funds. Using AppComposer, you are able to connect the JSP pages from the graphics department to the EJBs from the IS department, and thus display the user's fund data in a graphically pleasing setting.
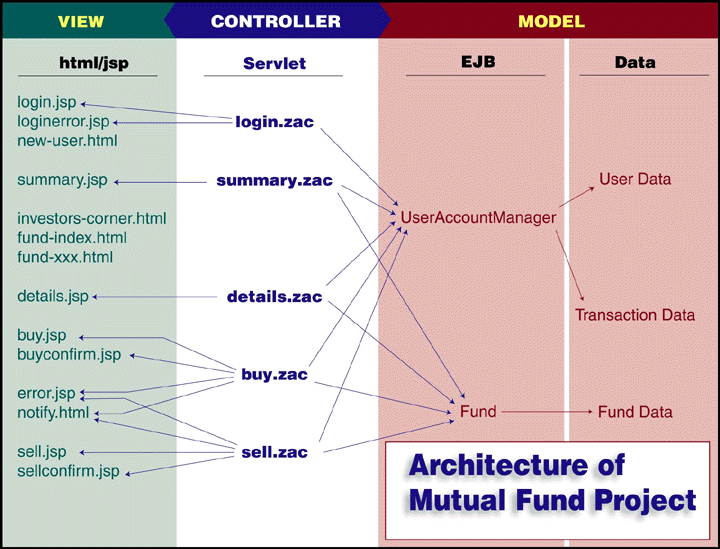
AppComposer occupies the middle tier in the traditional n-tier application. In an n-tier application, the functionality is broken into layers, or tiers, which focus on presentation, business logic, and data access.With AppComposer, you can implement business rules and logic to connect the presentation layer to the data access layer. Another way of thinking about this type of application is with the traditional Model-View-Controller (MVC) design pattern. Using this type of architectural analysis, you can use AppComposer to create the controller that connects the view, represented by the JSP and HTML files, to the model, implemented by the EJB and legacy database system. You can think of MVC as the Model-View-(App)Composer design pattern.

AppComposer makes it easy for you to concentrate on the business logic of your web application. You can let the graphics department worry about the look and feel. You can let the IS department worry about the nitty-gritty details of accessing the legacy data. AppComposer allows everyone in the organization to do what they do best, and results in a better web application, done quickly and easily.
To make all these pieces fit together, there must be lots of communication and coordination between you, as the application composer, and the people working on the graphics and data access components. Typically, you create a requirements specification document that details the programmatic messaging that needs to occur between the component layers. The specification document can be thought of as a contract between the various components of the application. For example, the specification would describe the methods that are provided by the EJB data access components to the AppComposer capsules. Likewise, the specification also would describe the custom JSP tags that the capsule writer will make available to the JSP page authors so that they can obtain the dynamic data they need to fill out their pages. An example of what such a document might look like can be seen by following this link.
Note: Ideally, your specification is an outgrowth of a requirements process that clearly defines the objectives for the project.
In working with this tutorial, you have been provided with finished JSP and HTML pages and also with EJB components to access the underlying database, just as you would in a real-world project using AppComposer. In addition, some of the capsules necessary for the full mutual fund application, such as the buy and sell capsules, have been provided for you. Your job in this tutorial is to implement a login page and a summary page that shows the fund holdings of a logged-in user.
To see the finished project, you can run the working files found in the AppComposer/examples/MutualFund/ directory.
The figure below shows the various components that make up the mutual fund application. You will implement the capsules login.zac and summary.zac.

Words in italic stand for user-defined variables, or filename placeholders.
For instance, the path to this tutorial file on your machine may be in the directory
d:\Program Files\AppComposer\docs\manuals\MutualFundTutorial. Since this differs
from user to user, we use the convention AppComposer/docs/manuals/MutualFundTutorial.
Substitute your actual path.
Menu names and GUI items appear in sans serif font. For instance: Select Edit from the Capsule menu.
Information that you type appears in bold. For instance: Enter Hello, world! into the text field.
Before you can run this tutorial successfully, you must set the preferences for AppComposer so that the JBoss EJB server and debug web server are running.
1. Select the Edit > Preferences... menu command.
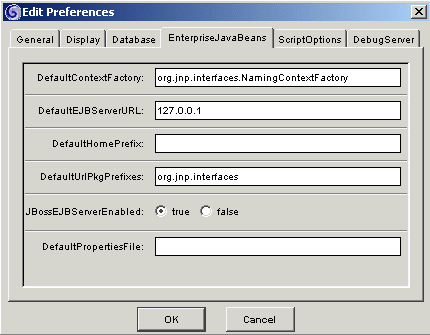
2. Select the EnterpriseJaveBeans tab from the preferences dialog and set the JBossEJBServerEnabled radio button to true.
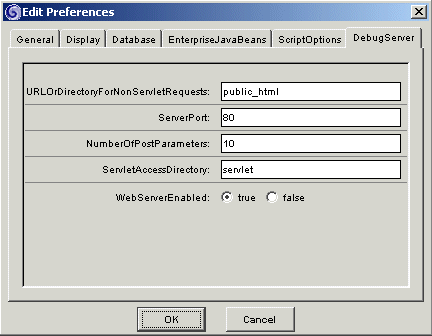
3. Likewise, select the DebugServer tab and set the WebServerEnabled radio button to true.
You should only have to do these setup tasks once. Each time you restart,
App AppComposer will remember these settings.
The first task in this tutorial is to create a login page for your web site. This page will prompt the user for a username and password, and then validate the login information against a database of users and passwords. If the user successfully logs in, the login page will forward the user on to a summary page that displays the user's current fund holdings. The login page will use an EJB component to validate the username and password, which shields you from having to know too many details about how the user information is actually stored in the database. Isolating the knowledge of how the login information is processed in an EJB component reduces the complexity of your capsule code and increases the security of the system as a whole. The look and feel of the web page is determined by a login JSP page provided by your graphics department.
In this first part of the tutorial you will focus on just getting something up on the screen. This section describes the basic steps needed to create a capsule that displays a JSP page.
You'll find this project file in the AppComposer/docs/manuals/MutualFundTurotial directory. Notice that many JSP and HTML files already exist in this project. These are the resources that were created by your graphics department. You might want to click on the html folder to see the HTML files that are contained within. NOTE: It is important that you leave the project file open while you are working on files contained within it.
Notice also that the project contains some existing capsule files for buying and selling funds and examining detailed fund transaction history. You can examine these capsules later to figure out how they work. Right now, you can focus on creating the login capsule.
a. Choose the File > New Capsule > Servlet menu item.
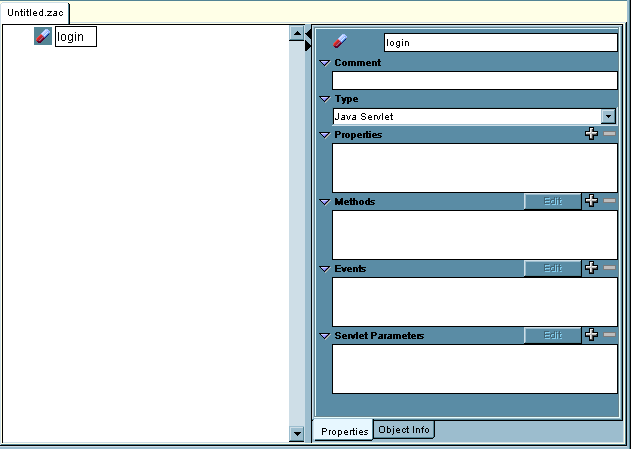
b. Rename the top-level capsule login
AppComposer supplies the JSPTemplate component to make it easy to incorporate JSP or HTML pages into your capsules. That way, the graphics and display characteristics of your pages can be worked on separately from the logic of the capsule. You can think of the JSPTemplate as a capsule-provided holder for JSP pages.
a. Select the login capsule
b. Insert a JSPTemplate by clicking ![]() from the palette's Html
category
from the palette's Html
category
c. Name it LoginPage
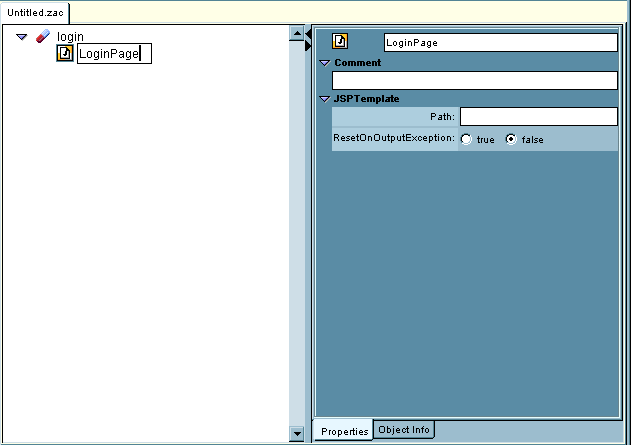
d. In the properties panel, set the path property to login.jsp and add a comment if you wish. The path property tells the template where to find the JSP file to incorporate into the capsule. The path should be relative to the location of the capsule file.

The ServletGet behavior is a pre-built grouping of a sequence of actions that are common to processing the servlet GET request. AppComposer packages ServletGet into a saved group because it is so common to use the same combination of actions when creating servlet capsules. As you progress, you may find that you want to save some of your own combinations of actions. Once saved, your custom behaviors will show up in the Saved Group menu along with the provided ServletGet behavior. This ability to combine repeatedly used groupings of actions into saved groups is one way that AppComposer encourages and facilitates code reuse.
a. Select LoginPage
b. Insert a ServletGet by clicking ![]() from the palette's Saved Groups category
from the palette's Saved Groups category
c. Name it GET username and password

The two actions that make up the ServletGet user behavior set the content type of the output to HTML and then call the print method of the JSP Template, causing the JSP page to be displayed in the user's browser window.
Save login.zac in the same directory as the MutualFund.zap project.
a. Choose the Project > Add menu item.
b. Browse to the login.zac file and click Add.
You can run the login capsule by choosing File > Run, or by typing the Ctrl-r keyboard shortcut, or by opening a browser to the address shown in the picture below. If you are reading this tutorial on line, you should open a second browser window so you can continue reading it while the capsule runs in the browser. You should see the login page, as shown here:
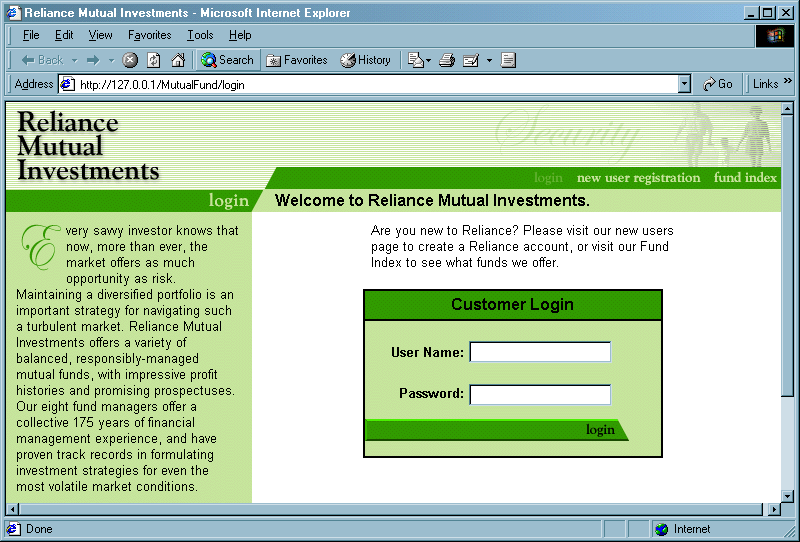
Click the login button. You'll see a blank page right now. Netscape 4.7 may even give you an error message. In the next part of the tutorial you will add the code to send the user to a page that announces their successful login.
The steps you have just performed; creating a servlet capsule, inserting a JSP template, and adding a servlet get behavior, are very common when creating web applications with AppComposer. The idea that a capsule/servlet can contain a JSP page represented by the JSP template is a fundmental concept in AppComposer programming.
In the previous section, you hooked up the login.zac capsule to the login.jsp file. In that part of the tutorial you handled the GET request on the login capsule. In this next part you will add actions to the capsule to handle the POST request and use the parameters passed to the POST handler to create an EJB that validates the user login.
Taking a closer look at the JSP file, login.jsp, you should take note of a couple of key things.
First, notice that the login jsp page contains a form whose action is to send a POST request back to the login capsule/servlet (that is, back to the same capsule that displayed the login form in the first place), as shown by the following line from login.jsp:
<composer:form method="POST" action="login">
Second, notice that there are two form text input fields, named username and password, that the user fills in before pressing the login button on the form, as shown by these lines from login.jsp:
<composer:text size="20" maxlength="8" name="username" value=""/>
<composer:password size="20" name="password" maxlength="8" value=""/>
The values from these form fill-in fields are sent along as additional parameters with the form's POST request.
The first task in this part of the tutorial is to insert an EJB object into your capsule, as described in the following steps. After that, you will add actions to handle the POST request and pass the username and password parameters to the EJB to validate the user.
a. Select the login capsule.
b. Insert an UserAccountManager by clicking ![]() from the palette's EJBGen
-> ejb category
from the palette's EJBGen
-> ejb category
c. Leave name as UserAccountManager

a. Select LoginPage
b. Insert a ServletGet by clicking ![]() from the palette's Saved Groups category
from the palette's Saved Groups category
c. Name it POST: check login
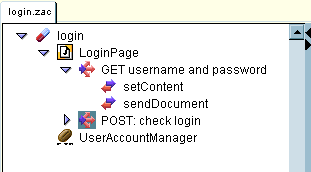
Now change the activation for the ServletGet ActionGroup from doGet to doPost.
In the properties panel for POST: check login, in the Stimulus section:
d. Receive: ServletRequest.doPost

In the next three steps, you will add three actions to perform when the POST request is received
a. Select POST: check login
b. Insert an Action by clicking ![]() from the palette's Behaviors
category
from the palette's Behaviors
category
c. Type Ctrl-U to move the new action to top of list under POST: check login
d. Name it CreateEJB
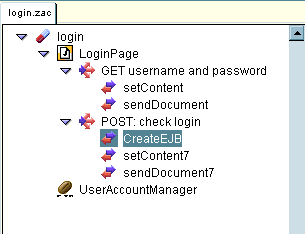
e. Leave the default stimulus settings, receiving Behavior.activated from parent
Change the Action settings as follows:
f. Send To: UserAccountManager
g. Message: create
h. Eval: capsule.getParameter("username")
You need to type in "username"
i. Eval: capsule.getParameter("password")
You need to type in "password"
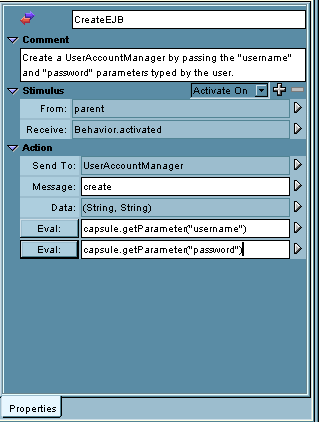
Remember that the username and password came from the login.jsp form entry fields descibed at the beginning of this section.
Next, you need to store the EJB that you just created in the session object of the capsule. The session, sometimes referred to as an HTTP session, is an object maintained by the servlet engine. It is a place where you can store objects that will be used by more than one capsule. You can think of the session as global storage for all the servlets in your application. In addition, one special aspect of sessions is that the servlet server creates a separate session for each user that is connected to the application, so it is a perfect place for you to store the EJB that represents the current user.
In this case, you have used the username and password to create an EJB that represents the user that just logged in. By storing this EJB in the session, the EJB becomes available across multiple requests to other capsules that are part of your web application. You will be retrieving the EJB from the session later when you implement the summary capsule. That way, when the user moves from the login page to the summary page, the summary page will have a way to determine if the user has successfully logged in.
The steps necessary to store the EJB in the session are listed below:
a. Select POST: check login
b. Insert an Action by clicking ![]() from the palette's Behaviors
category
from the palette's Behaviors
category
c. Type Ctrl-U to move new action up to just below CreateEJB
d. Name it Save EJB in session

e. Leave the default stimulus settings, receiving Behavior.activated from parent
Change the Action settings as follows:
f. Send To: capsule
g. Message: setSessionValue
h. Const: fundUserEJB
Remember this name, fundUserEJB. You will use it later in the summary capsule to extract the EJB from the session.
i. Eval: UserAccountManager.getProxiedObject()
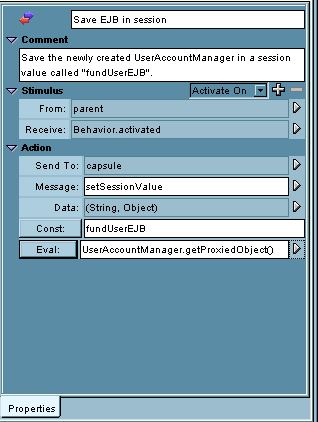
Using the proxied object of the EJB is a AppComposer-specific technique that allows you to easily store and retrieve the EJB from the HTTP session as you move from page to page in your web app. The proxied object shields you from most of the complexity of creating EJB components.
Now that the user EJB has been created and saved, you can forward the POST request to the success page. At this point, the user has successfully logged in and you want to display a summary page of the user's fund accounts, but you haven't written the summary capsule yet. As a short-term solution, you can forward the request to a static success page, just to make sure that the logic of your capsule is correct. Later, when you have built the summary page, you will come back to this step and hook up the forward operation to the actual summary page.
a. Select POST: check login
b. Insert an Action by clicking ![]() from the palette's Behaviors
category
from the palette's Behaviors
category
c. Name it forward to summary page
d. Leave the default stimulus settings, receiving Behavior.activated from parent
Change the Action settings as follows:
e. Send To: capsule
f. Message: forward
g. Const: /html/loginsuccess.html

You will change this forward link later on, after you have built the summary page.
You also need to delete the sendDocument action that came along with the POST: check login behavior you inserted earlier. You must delete this action because you are forwarding to another page rather than sending the original page. The actual name may be different on your system, (for example, SendDocument6). Select the sendDocument7 item under the POST check login action group (not the sendDocument item under the GET username and password group) and choose the Edit > Delete menu item to delete the object.

Type in testuser and password as the username and password.
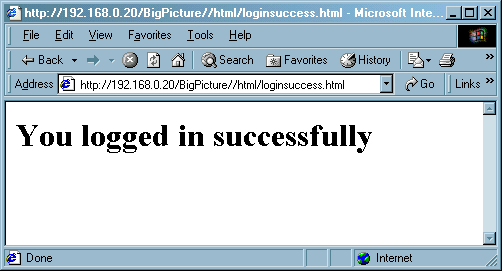
At this point, you should see a success page if you enter the correct username and password. Later, you will substitute a real fund summary page for this temporary success page.
At this point, you have successfully created a login page that gets user input and uses that input to create an EJB that validates the user against a database of user information. You have also stored that EJB into the HTTP session so that as the user moves from page to page in your web application, the EJB that represents the user login identity will be available.
In this section, you will handle login errors. You will catch exceptions that are generated when you create the UserAccountManager EJB and forward them on to an error page. You will also create an external callback method on the capsule that the error JSP page can call to retrieve the error message generated by the exception.
a. Select the login capsule
b. Insert a String by clicking ![]() from the palette's Data Items
category
from the palette's Data Items
category
c. Name it errorString
The ability to easily define external callback methods for capsules is one of the most exciting features of AppComposer. You can define arbitrary methods on a capsule and make these callback methods available to JSP page authors so that they can access information from your capsules for their JSP pages. The custom JSP tags used by AppComposer are built upon the tag library capability that is part of the JSP specification, but the ease with which you can do this is the key to its usefulness.
a. Select the login capsule
b. Insert an Action by clicking ![]() from the palette's Behaviors
category
from the palette's Behaviors
category
c. Name it getErrorString
In the Stimulus section:
d. From: capsule
e. Create a new method for the capsule by selecting Capsule > New Method... from the Receive: control
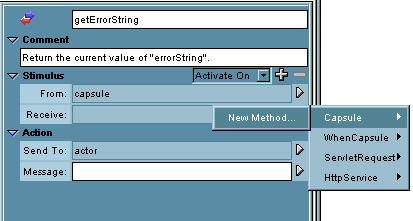
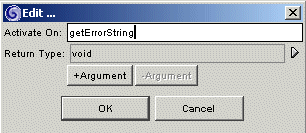
You don't need to set the return type or add any arguments to the getErrorString method, so type in the name, getErrorString, and click OK. Returning to the getErrorString action properties panel, fill in the rest of the information needed to define the getErrorString action.
e. Send To: capsule
f. Message: print
g.Eval: errorString
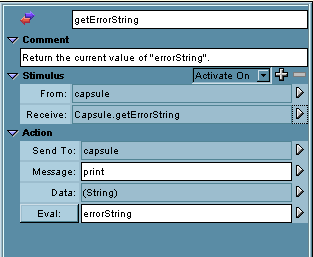
The new capsule method that you have defined here, getErrorString, is called by the loginError.jsp page to display the error message generated by the EJB. The capsule method simply prints out the contents of errorString, whose value is set in the exception handler defined in the next steps, and that output is incorporated into the JSP page's final output. You will see the details of how the JSP page calls the capsule method in the final step of this section.
Define an ActionGroup to group all the actions that you will perform when there is an exception thrown by the login process.
a. Select POST: check login
b. Insert an ActionGroup by clicking ![]() from the palette's Behaviors
category
from the palette's Behaviors
category
c. Name it HandleException
In the Stimulus section of the properties panel:
d. From: parent
e. Receive: Exception.activated

There are several types of exceptions that can be generated by the CreateEJB action. The username and password could be incorrect. The EJB might not be able to connect to the database, or the EJB server might not be running. All of these exceptions will be caught by the HandleException action group. In the next three steps, you will insert actions in this action group to handle the exception, retrieve a textual description of the exception, and forward the user to a error handling page that displays the description of the error.
a. Select HandleException
b. Insert an Action by clicking ![]() from the palette's Behaviors
category
from the palette's Behaviors
category
c. Name it setErrorString
d. Leave the default stimulus settings, receiving Behavior.activated from parent.
Change the Action settings as follows:
e. Send To: errorString
f. Message: set
g. Eval: getExceptionMessage()
Note: if you manually type in the Eval expression above, just type in getExceptionMessage(). If you use drop down menus to choose the method, then choose event > getExceptionMessage().
When an exception occurs, you want to include a different jsp page that will display the error message to the user.
a. Select HandleException
b. Insert an Action by clicking ![]() from the palette's Behaviors
category
from the palette's Behaviors
category
c. Name it reset jsp path
d. Leave the default stimulus settings, receiving Behavior.activated from parent
Change the Action settings as follows:
e. Send To: LoginPage
f. Message: setPath
g. Const: loginError.jsp
a. Select HandleException
b. Insert an Action by clicking ![]() from the palette's Behaviors
category
from the palette's Behaviors
category
c.Name it sendErrorPage
d. Leave the default stimulus settings, receiving Behavior.activated from parent
Change the Action settings as follows:
e. Send To: LoginPage
f. Message: print
g. Eval: capsule.getWriter()
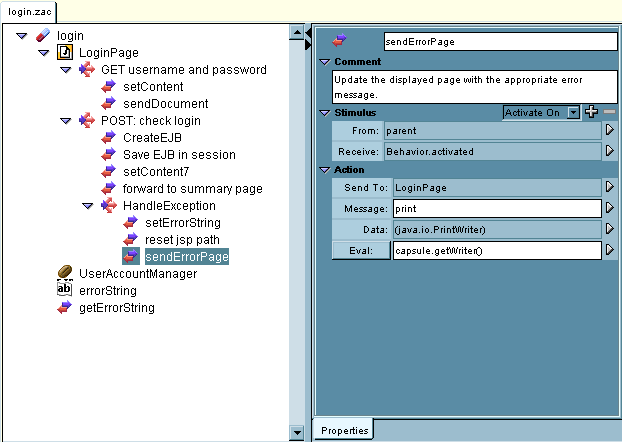
Test with valid and invalid username-password combinations.
For an invalid username and password, you should see the following screen:

Note: If you see an error message on this page that says Connection refused: no further information, you probably need to edit the preferences for AppComposer to make sure that the JBoss EJB server is running, as described in AppComposer Setup.
The JSP page that generates this error page, loginError.jsp, contains an AppComposer custom tag that calls the getErrorString method of your capsule. The relevant JSP code that calls that capsule method is shown here, in a fragment from loginError.jsp:
<composer:call method="getErrorString"/>
The getErrorString method, that you defined earlier in this section, returns the error string from the exception generated when you tried to create the EJB with inputs that did not validate against the underlying database.
The ability to easily and quickly define new capsule methods that can be called from JSP files is one of the most distinguishing and productive aspects of programming with AppComposer.
Now you will create the summary page that is the destination after a successful login. The summary page displays a table listing information about the funds owned by the current user. The summary page uses the UserAccountManger EJB you created in the login page to get the user's fund information from the database. In addition, it uses another EJB component, the Fund bean, to get real time price information about a particular fund.
In the first stage you create the capsule, hook it up to a JSP, and then extract the EJB from the HTTP session and use it to identify the user.
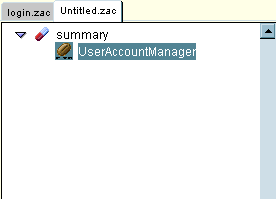
a. Choose the File > New Capsule > Servlet menu item.
b. Rename it summary
a. Select summary capsule
b. Insert an UserAccountManager by clicking ![]() from the palette's EJBGen
category
from the palette's EJBGen
category
c. Leave name as UserAccountManager
a. Select summary capsule
b. Insert a JSPTemplate by clicking ![]() from the palette's Html
category
from the palette's Html
category
c. Name it SummaryPage
d. Set its path to summary.jsp
a. Select SummaryPage
b. Insert a ServletGet by clicking ![]() from the palette's Saved Groups category
from the palette's Saved Groups category
c. Name it Servlet Get and Post
d. Now add an activation for the ActionGroup to respond to doGet and doPost. You can add an activation event by clicking on the "+" icon in the properties panel.
e. From: capsule
f. Receive: ServletRequest.doPost
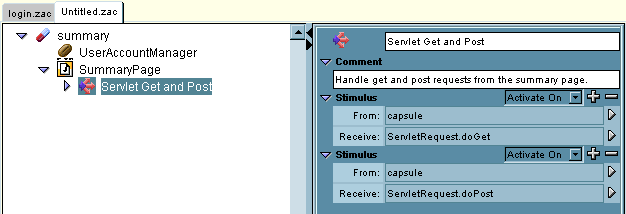
Notice that now you have an action that responds to both GET and POST request messages for the summary servlet/capsule. In the login capsule from the previous sections, you wanted different behavior for GET and POST. Here, in the summary capsule, you want the same behavior for GET and POST. AppComposer gives you that flexibility.
Now add some logic to check if the HTTP session contains an EJB indicating that the user has successfully logged into your site. Use the name fundUserEJB, originally used in the login page to save the EJB in the session, to extract the EJB from the session.
a. Select Servlet Get and Post
b. Insert an ifTest by clicking ![]() from the palette's Behaviors
category
from the palette's Behaviors
category
c. Type Ctrl-u to move it up until it is the first action in the Servlet Get and Post action group
d. Name it Is User EJB in Session
e. Leave the default stimulus settings, receiving Behavior.activated from parent
f. Change the Expression settings to capsule.getSessionValue("fundUserEJB") != null
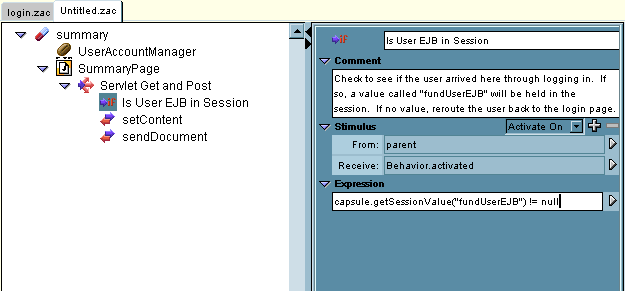
Note: you can Ctrl-click on capsule to choose getSessionValue from the popup menu.
Now you can add an action group that is activated when the ifTest is true. This action group will group together the actions that need to occur when the user EJB is found in the session.
a. Select Is User EJB in Session
b. Insert an ActionGroup by clicking ![]() from the palette's Behaviors
category
from the palette's Behaviors
category
c. Name it User in session
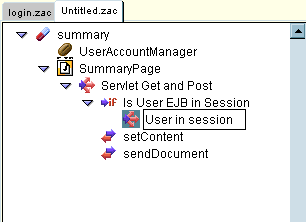
d. Change the stimulus settings to From: parent Receive: Test.ifTrue
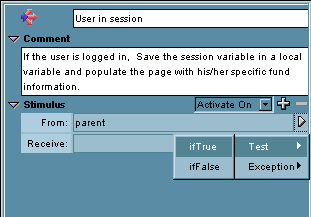
Insert an action in the User in session action group to copy the EJB from the session to your local UserAccountManager. You will use setFromProxiedObject here to extract a copy of the EJB from the session in the same way that you used getProxiedObject to store the EJB in the session in the login capsule.
a. Select User in Session action group
b. Insert an Action by clicking ![]() from the palette's Behaviors
category
from the palette's Behaviors
category
c. Name it Set fund user
d. Leave the default stimulus settings, receiving Behavior.activated from parent
Change the Action settings as follows:
e. Send To: UserAccountManager
f. Message: setFromProxiedObject
g. Eval: capsule.getSessionValue("fundUserEJB")

You also need to handle cases in which the user is not logged in. That is, where there is no fundUserEJB bean in the session.
a. Select Is User EJB in Session
b. Insert an ActionGroup by clicking ![]() from the palette's Behaviors
category
from the palette's Behaviors
category
c. Name it User not in session
d. Change the stimulus settings to From: parent Receive: Test.ifFalse

Insert an action in the group to handle the user-not-logged-in case by resetting the JSPTemplate path to point back to the login page. That way, if someone gets to the summary page without having first logged in, you can send them to the login page instead.
a. Select User not in Session
b. Insert an Action by clicking ![]() from the palette's Behaviors
category
from the palette's Behaviors
category
c. Name it set login page path
d. Leave the default stimulus settings, receiving Behavior.activated from parent
Change the Action settings as follows:
e. Send To: actor
f. Message: setPath
g. Const: login.jsp

Save summary.zac in the same directory as the MutualFund.zap project file.
You need to go back to login to make a change to hook up the summary page that you just created to the forward action in login, as described below.
You can test the new summary capsule by going back to the login capsule and changing the forward action to refer to the summary capsule instead of the static success page you used earlier.
a. Select the forward to summary page action.
b. Change the parameter to /summary instead of /html/loginsuccess.html
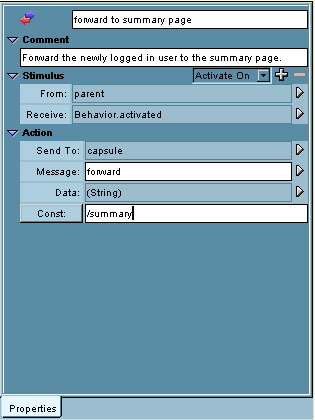
Log in with a valid username and password, (testuser, password)
At this point, you should see a summary page with an empty table. In the next section you will add the looping structures needed to show a table row for each fund owned by the user.
This section has shown you how the user login information can be transferred from the login capsule to the summary capsule by storing an EJB in the HTTP session. The technique of passing objects between servlets in the session is very common in servlet programming, and AppComposer fully supports this usage pattern.
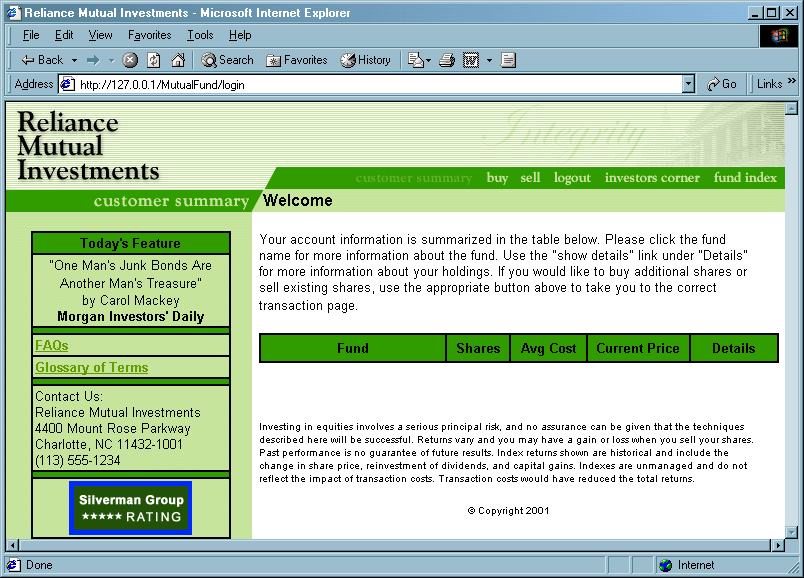
In this section, you will create looping structures that use the EJB components to get information about the funds owned by the user who is currently logged in. The looping technique uses a combination of capsule callback methods and special AppComposer JSP tags within the JSP page.
The first steps insert the EJBs and data beans you will use to get the fund information for the summary table, as described by the next three steps.
a. Select summary capsule
b. Insert a FundSummaryList
by clicking ![]() from the palette's Model
category
from the palette's Model
category
c. Leave name as FundSummaryList
a. Select summary capsule
b. Insert a FundSummary
by clicking ![]() from the palette's Model
category
from the palette's Model
category
c. Leave name as FundSummary
a. Select summary capsule
b. Insert an int by clicking ![]() from the palette's Data Items category
from the palette's Data Items category
c. Name it counter

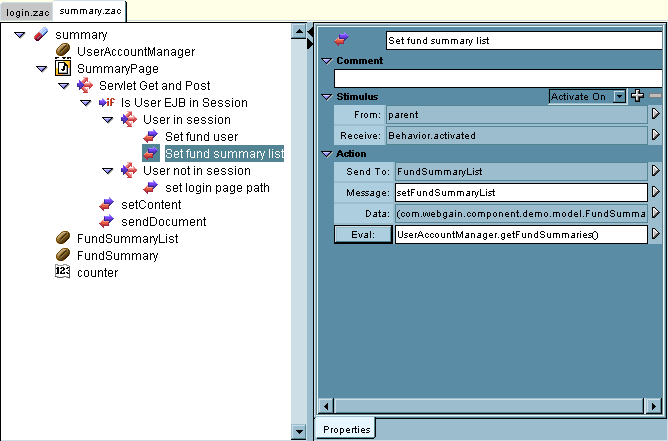
Next, add an action to initialize FundSummaryList by calling the getFundSummaries method of the UserAccountManager EJB. This method gets a list of information about the funds owned by this particular user.
a. Select the User in session action group
b. Insert an Action by clicking ![]() from the palette's Behaviors
category
from the palette's Behaviors
category
c. Name it Set fund summary list
d. Leave the default stimulus settings, receiving Behavior.activated from parent
Change the Action settings as follows:
e. Send To: FundSummaryList
f. Message: setFundSummaryList
g. Eval: UserAccountManager.getFundSummaries()
Now you can add the external callback function, moreRows that is called by the JSP to loop over all the funds owned by the user.
First, insert an ifTest to compare your counter to the length of FundSummaryList. Activate this ifTest on the new capsule callback method moreRows.
a. Select summary capsule
b. Insert an ifTest by clicking ![]() from the palette's Behaviors
category
from the palette's Behaviors
category
c. Name it moreRows
In the Stimulus section:
d. From: capsule
e. Create a new method for the capsule by selecting Capsule > New Method... from the menu
f. In the dialog, name the method moreRows
g. Expression: counter < FundSummaryList.size()

Insert an action group to hold the actions that needs to occur for each row as you loop through all the funds owned by the user.
a. Select moreRows
b. Insert an ActionGroup by clicking ![]() from the palette's Behaviors
category
from the palette's Behaviors
category
c. Name it more Rows True
In the Stimulus section:
d. From: parent
e. Receive: Test.ifTrue
Next, insert the three actions you want to occur for each row, as described by the next three steps.
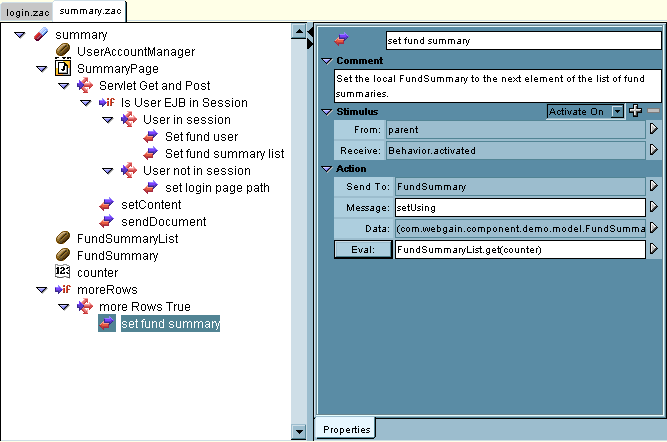
The FundSummaryList bean has an indexed function, get, that returns the nth element of the list. Each time through the loop, use your counter to extract the next element of the list of fund summaries.
a. Select more Rows True
b. Insert an Action by clicking ![]() from the palette's Behaviors
category
from the palette's Behaviors
category
c. Name it set fund summary
d. Leave the default stimulus settings, receiving Behavior.activated from parent
Change the Action settings as follows:
e. Send To: FundSummary
f. Message: setUsing
g. Eval: FundSummaryList.get(counter)
Each time through the loop you need to increment the loop counter after you have used it to get a fund summary object from the current position in the fund summary list.
a. Select more Rows True
b. Insert an Action by clicking ![]() from the palette's Behaviors
category
from the palette's Behaviors
category
c. Name it increment counter
d. Leave the default stimulus settings, receiving Behavior.activated from parent
Change the Action settings as follows:
e. Send To: counter
f. Message: set
g. Eval: counter + 1

Finally, set the test result for the capsule so the JSP making the callback will know to keep looping.
a. Select more Rows True
b. Insert an Action by clicking ![]() from the palette's Behaviors
category
from the palette's Behaviors
category
c. Name it setTestResult
d. Leave the default stimulus settings, receiving Behavior.activated from parent
Change the Action settings as follows:
e. Send To: capsule
f. Message: setTestResult
g. Const: true
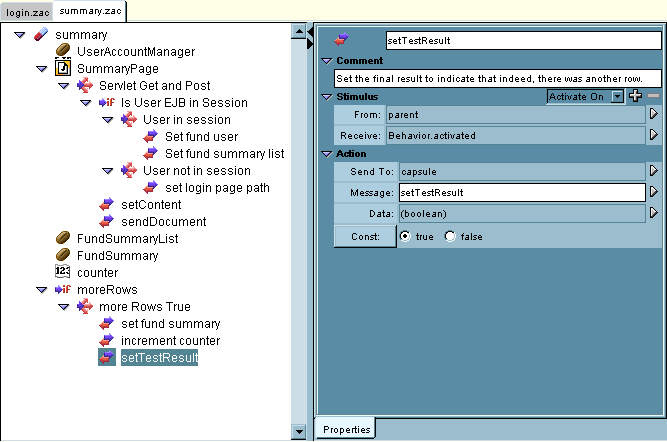
At this point, you can understand how this looping technique works between the capsule and the JSP page. In the capsule, you have defined a callback method named moreRows. That method does a test against the capsule's counter variable and the length of the fund summary list. As long as the counter is less than the length of the list, the capsule extracts the next fund summary from the list, increments the counter, and returns true. The JSP page, on the other hand, uses a special AppComposer looping tag, as shown here in a fragment from summary.jsp:
<composer:repeat method="moreRows">
Notice that the repeat tag has an attribute that is the name of a callback method of the containing capsule to call. Depending on the return value from that method, the JSP tag knows whether to keep repeating. Again, you can see that the ability to easily define custom capsule callback methods gives you a great deal of flexibility in defining arbitrary messaging between JSP pages and their containing capsules.
Now insert an action to handle the case in which the JSP has called moreRows repeatedly until your capsule has gone though all the funds in the fund summary list and it is time to terminate the loop. This action, which activates when the moreRows test is false (that is, when the counter is greater than or equal to the length of the fund summary list), simply sets the test result in the capsule to false, which tells the calling JSP to stop looping.
a. Select moreRows
b. Insert an Action by clicking ![]() from the palette's Behaviors
category
from the palette's Behaviors
category
c. Name it no more rows
In the Stimulus section:
d. From: parent
e. Receive: Test.ifFalse
Change the Action settings as follows:
f. Send To: capsule
g. Message: setTestResult
h. Const: false

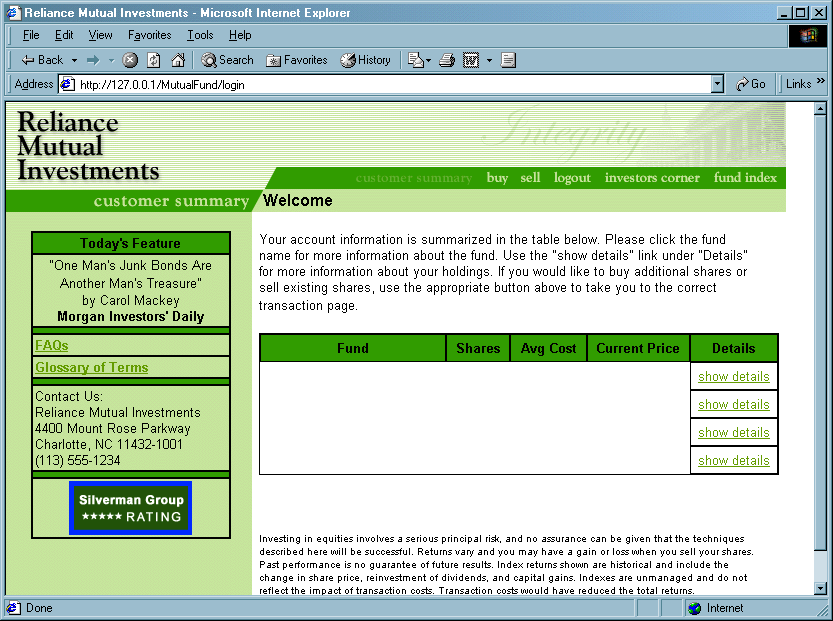
Log in with valid username and password to see the summary page.
You should see rows of a table with empty cells. At this point, you have created a table row for each fund owned by the user, but you have not yet made the specific data for each cell in the row available to the JSP. That comes in the final section of the tutorial.
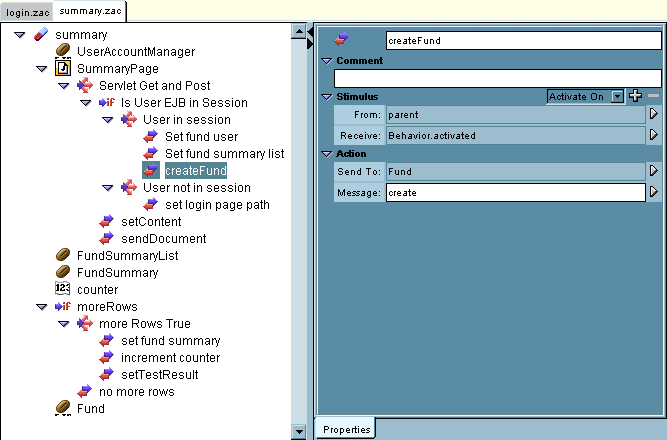
In this section, you create the capsule callback methods so that the JSP page can get the data about each fund to fill in the individual cells in the table rows. The implementation of these callback methods that you will create here calls upon two different EJB components as well as several Java bean components.
The Fund EJB component can get information about any particular fund, such as its full name and current price. This section demonstrates how easy it is to integrate multiple EJBs into a single capsule.
a. Select summary capsule
b. Insert a Fund EJB by clicking ![]() from the palette's EJBGen
category
from the palette's EJBGen
category
c. Leave name as Fund
a. Select User in session action group
b. Insert an Action by clicking ![]() from the palette's Behaviors
category
from the palette's Behaviors
category
c. Name it createFund
d. Leave the default stimulus settings, receiving Behavior.activated from parent
Change the Action settings as follows:
e. Send To: Fund
f. Message: create
The next several steps repeatedly add callback methods to give fund data to the calling JSP. In each case, you will insert an action in the capsule, define a new capsule callback method as its activation trigger, and evaluate an expression using the EJB and beans to compute the dynamic data about the fund currently being displayed.
For each of the callback methods defined below, there is a corresponding AppComposer JSP tag in summary.jsp. For example, for the callback getFundName, the JSP code in summary.jsp that calls this method is shown here:
<composer:call method="getFundName"/>
In the following sections, you will see how easy it is to create custom callback methods on capsules and call them from JSP pages.
a. Select summary capsule
b. Insert an Action by clicking ![]() from the palette's Behaviors
category
from the palette's Behaviors
category
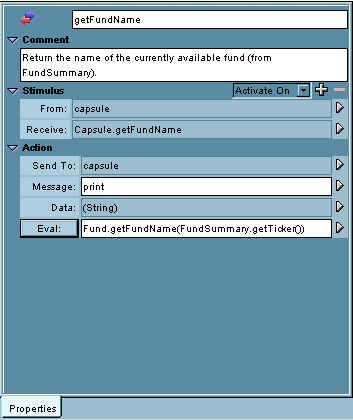
c. Name it getFundName
In the Stimulus section:
d. From: capsule
e. Create a new method called getFundName for the capsule by selecting Capsule > New Method... from the menu.


In the Action section:
f. Send To: capsule
g. Message: print
h. Eval: Fund.getFundName(FundSummary.getTicker())
a. Select summary capsule
b. Insert an Action by clicking ![]() from the palette's Behaviors
category
from the palette's Behaviors
category
c. Name it getNumShares
In the Stimulus section:
d. From: capsule
e. Create a new method called getNumShares for the capsule by selecting Capsule > New Method... from the menu.
In the Action section:
e. Send To: capsule
f. Message: print
g. Eval: " " + FundSummary.getNumShares()
The technique of combining a empty, "", with FundSummary.getNumShares(), as seen in the Eval field above, is necessary because the print method you are calling expects a String argument, and getNumShares() returns a float. By combining the float return value with a literal string, you can force the entire expression into a String that satisfies the print method's argument expectations. This technique is used in several other method definitions that follow.
a. Select summary capsule
b. Insert an Action by clicking ![]() from the palette's Behaviors
category
from the palette's Behaviors
category
c. Name it getAveragePrice
In the Stimulus section:
d. From: capsule
e. Create a new method called getAveragePrice for the capsule by selecting Capsule > New Method... from the menu.
In the Action section:
f. Send To: capsule
g. Message: print
h. Eval: " " + FundSummary.getAveragePrice()
a. Select summary capsule
b. Insert an Action by clicking ![]() from the palette's Behaviors
category
from the palette's Behaviors
category
c. Name it getCurrentPrice
In the Stimulus section:
d. From: capsule
e. Create a new method called getCurrentPrice for the capsule by selecting Capsule > New Method... from the menu.
In the Action section:
f. Send To: capsule
g. Message: print
h. Eval: " " + Fund.getCurrentPriceForFund(FundSummary.getTicker())
a. Select summary capsule
b. Insert an Action by clicking ![]() from the palette's Behaviors
category
from the palette's Behaviors
category
c. Name it getFundId
In the Stimulus section:
d. From: capsule
e. Create a new method called getFundId for the capsule by selecting Capsule > New Method... from the menu.
In the Action section:
f. Send To: capsule
g. Message: print
h. Eval: FundSummary.getTicker()
a. Select summary capsule
b. Insert an Action by clicking ![]() from the palette's Behaviors
category
from the palette's Behaviors
category
c. Name it getName
In the Stimulus section:
d. From: capsule
e. Create a new method called getName for the capsule by selecting Capsule > New Method... from the menu.
In the Action section:
f. Send To: capsule
g. Message: print
h. Eval: UserAccountManager.getFullName()
a. Select summary capsule
b. Insert an Action by clicking ![]() from the palette's Behaviors
category
from the palette's Behaviors
category
c. Name it getFundURL
In the Stimulus section:
d. From: capsule
e. Create a new method called getFundURL for the capsule by selecting Capsule > New Method... from the menu.
In the Action section:
f. Send To: capsule
g. Message: print
g. Eval: Fund.getFundPageURL(FundSummary.getTicker())
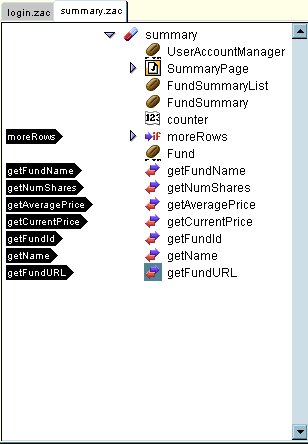
At this point, you can press the m button in the capsule window toolbar to see all the callback methods you have defined for this capsule, as shown below:
You can add a number formatter to clean up the display of the decimal dollar figures in the table. Without the number formatter, the decimal numbers will be displayed with many fractional digits, usually more than is appropriate for currency values. AppComposer provides a NumberFormatter bean that makes it easy to format numbers for user display.
a. Select summary capsule
b. Insert a NumberFormatter by clicking ![]() from the palette's Misc
category
from the palette's Misc
category
In the properties panel:
c. InstanceType: CURRENCY
d. MaximumFractionDigits: 2
e. MinimumFractionDigits: 2

a. Select the getCurrentPrice action
b. Eval: NumberFormatter.format(Fund.getCurrentPriceForFund(FundSummary.getTicker()))

a. Edit properties for getAveragePrice
b. Eval: NumberFormatter.format(FundSummary.getAveragePrice())
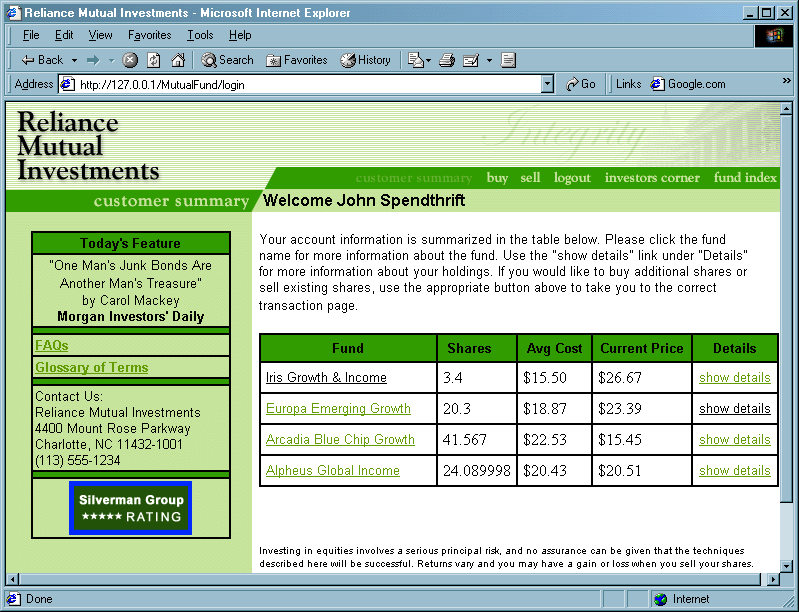
At this point, you should see a table showing all the fund information for this user. The individual cells of the table have been filled in by the JSP page code that calls the capsule's callback methods to retrieve the data from the fund EJB components.
Congratulations, you have finished the Mutual Fund Web Application tutorial.
This tutorial has shown you how to use AppComposer to hook up JSP pages to EJB components to create a full-fledged web application. The capsules sit in the middle tier, providing callback methods that allow the JSP pages to extract data from the EJB components simply by using special AppComposer tags.
There are three main ideas in this tutorial:
1. Most AppComposer web applications involve capsules that include JSP pages to do the actual display work. The capsule is mainly responsible for the controller functionality and business logic of the application.
2. AppComposer makes it very easy to use EJB components to handle the data modeling work of the application.
3. AppComposer capsules and JSP pages often communicate using custom capsule callback methods. This gives JSP pages an easy and flexible way to get data from capsules.
You might want to spend some time now looking at the JSP pages, paying special attention to the AppComposer tags that have the composer: prefix, such as <composer:call method="getFundName" />. You also might want to spend time exploring the other capsules, buy.zac, sell.zac, and details.zac, that are provided with this tutorial. Examining these other capsules and understanding how they work will reinforce many of the concepts introduced in this tutorial..
© 2003 DigiSlice Corporation